Showing posts with label Getting. Show all posts

Thursday, May 14, 2015

Charge Your Worth: The Complete Guide to Getting Paid

Energy, inspiration, emotion, talent, experience. Creating powerful design concepts takes everything we’ve got. You would think that clients would run to reward such a rare combination of hard work, momentary enlightenment and painfully acquired know-how. You would think. Instead, this is how it usually goes:


  1. Client calls creative with urgent need

  2. Creative invests it all in satisfying said need

  3. Client has no urgency to pay

Many of us are being treated as firefighters. We must come through with consistently impressive design concepts in exchange for completely uncertain pay. When clients approach us to solve their most pressing creative problems things run amazingly smoothly. They are eager to commit, negotiate a rate, agree on deadlines (now those are important to them), and get started ASAP (which is yesterday, of course). Once the fire goes away, however, everything seems to run more slowly. So, how exactly do we speed up the payment process, show our true value, and ensure that our creativity doesn’t starve?


Collecting payment will never be easy, but with the right tactics it can become bearable and even fulfilling. Here’s what you do to increase your chances of getting paid fairly and on time:
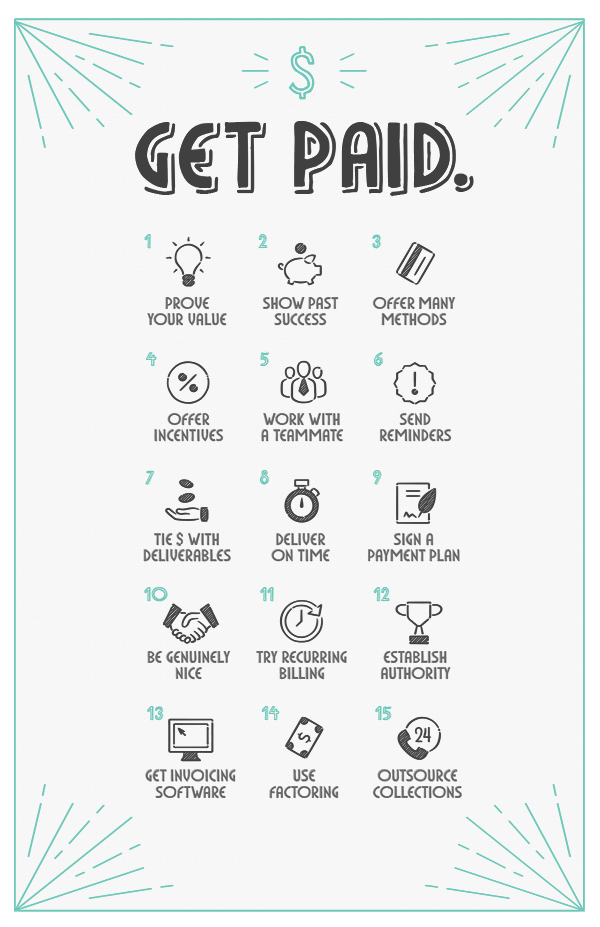

GuidetoGettingPaid


Print out a poster version of these tips.


1. Prove your value in economic terms.


Will your work boost brand recognition? What does that do for sales and revenue? How does that impact market share (broadly)? Arm yourself with research that proves the business value of design, and make sure that you communicate it to your client succinctly. Your business proposal is an ideal place to include these facts.


2. Show that you’ve been paid before.


Social proof can decrease the amount of risk that clients feel when they are about to pay for your services. Hey, if others have bet on your talent in the past, why would they miss out on it? In showing that your clients consistently pay for work, and do so on time, you will give a clear picture of what your expectations look like. I saw clients delay my agency’s payment while being completely on time with other types of suppliers, and had always wondered what they were doing right (or what we were doing wrong). Here’s what that was: other suppliers established that on-time payment was the minimum standard to carry on any type of relationship with them, and that this rule applied to absolutely everyone.


3. Offer more than one payment method.


Cash is not necessarily king when clients need convenience. Explore online payment tools that allow you to expand your clients’ payment options. Stripe offers credit and debit card payments, while Paypal allows for additional methods like real-time and delayed bank transfers. For in-office payments try Square.


4. Provide several payment schedules.


Don’t wait until they ask or default. Structure a tiered payment policy where those who pay first pay less (Early Payment Discount). Also show how a late payment can make them incur in unwanted penalties. While some designers cringe at the sound of “late fee”, including it up front does insulate you (and your team) from a budget-crushing delay. There’s no reason for a late fee to feel like a threat. It is the very least you can do to pass on the message that your waiting time is worth some real money (versus, you know, hot air). And don’t be fooled: a dollar today is worth much more than a dollar tomorrow. For every minute that your hard-earned cash spends in someone else’s wallet, there are several profitable investments that you could be engaging in instead.


5. Work with a teammate.


Listening to several voices asking for the same thing can increase the sense of shame for nonpayment. Ask someone from your team, or hire a third party, to contact the client on behalf of your company. While risky, hiring out a freelancer to make these types of calls might be a low-cost alternative. To hire a professional collections agency, check out point 15.


6. Send out automated email or SMS reminders.


As much as I struggled with this idea, not all clients are purposely trying to skip your payment. Sometimes memory fails and there are no systems in place for reminding themselves of upcoming dues. In this case, make sure that you do prepare to warn them about dates and fees. While a personalized email or call might seem the best way to go about it, these take valuable time away from the actual work that you are supposed to be doing for the client. After all, he/she hired you because of your design talent, not your ability to collect payment over the phone. Setup automated reminders with software packages like Quickbooks, Zoho Invoice, Xero or Freshbooks.


7. Tie key deliverables to payment.


Though this is a double-sided sword (i.e. you will miss payment whenever you miss a deadline), it’s a good business practice and will generally benefit the creator. Sometimes we ask for an advance upfront and a final payment after we’ve delivered everything the client has required. A smarter way to approach this is to condition key deliverables to paying different (smaller) percentages of the total bill. A key deliverable is something that is highly valuable in the eyes of the client: a finalized site launch, logo concept, or business card design are all good examples. If the client really wants to get a hold of his/her company’s new logo, attach a specific percentage of the total bill to that delivery. 30% upfront, 30% upon logo delivery and 40% at the end of all remaining work is an example of such types of agreements.


8. Deliver on time.


In the end, every design project is a transaction. You exchange currency (i.e. amazing work) for dollars. Make sure that you are holding up your end of that deal, and clients will feel the need to be reciprocal. To reinforce the idea that you are complying to what was signed, use wording like “as promised” or “as we agreed” in emails & other types of communications. These subtle pointers signal commitment, trust and reliability. Now, if we’re being super reliable, how could anyone want to disappoint us? (They don’t want to, but end up doing it anyway. Read on for more tactics).


9. Have them sign up to a payment plan with specific installments.


Some contracts include a specific space for signatures on the project payment plan. The advantage of having clients agree to this specific plan in advance is that they are committing to honoring your fees properly at the time when they need your services the most. With time, their initial urgency fades and can result in the firefighter effect that I discussed before. Hi! Excited to work with me? So am I. Now let’s agree on a payment promise while we’re both happy :)


10. Be genuinely nice.


When I first founded an agency in 2008, we gave out seasonal corporate gifts that reminded clients of how important our relationship was to us. I soon realized that we were not alone. This Corporate Gifting Survey, conducted by the Advertising Specialty Institute, concludes that businesses spend approximately on a single client’s gift. Top goals include showing appreciation, developing relationships and generating goodwill. Think about it: if corporate gifts weren’t effective business tools they wouldn’t be a billion market (in the US only). And reciprocity, my friends, can be a powerful thing.


11. Try recurring billing.


Is your client paying for a product or service on a monthly basis? Perhaps you have set up a continuous design service package, or you sell web design as a service (yes, this is a thing). In this case, you can set up a monthly billing plan with platforms like Paypal or Stripe. Your client’s card will automatically be charged each month, removing the stress associated with collecting your fees.


12. Establish authority in your communications pieces.


Think about how you can position yourself (or your team) as an expert in brand stationery, websites, proposals, contracts and other pieces. Do you belong to a professional organization? Has your business been certified by a partner? Has the agency won any awards? These are things that your client needs to know. In an environment of respect and admiration, it becomes harder to elude responsibilities.


13. Find and use robust timesheet/invoicing software.


Oh, let’s face it. Sometimes we’re not getting paid because we forgot to send that invoice. Whatever comes next is on us. To avoid delays that arise from our end of things, make sure to try an agile invoicing platform. If your fees are based on an hourly rate, there are amazing tools that will also help you keep track of the amount of work invested and calculate your bill automatically. For painless time tracking and invoicing, try Harvest, Ballpark, Ding, Toggl, Timely or Everhour.


14. Use factoring.


Factoring is a simple procedure where your outstanding invoices become cash in exchange for a specific fee. There are many banks and financial companies that will literally buy your accounts receivable (everything your clients still owe you) and turn it into cash. Their commission can go anywhere from 15 to 30% of your invoices, but conditions may vary depending on your annual revenue and other factors. For freelancer-friendly invoice advance options, try Fundbox and Bluevine.


15. Everything else failed? Outsource collections.


OK, we’ve reached that point. This negligent jerk simply won’t pay and nobody’s got time for that anymore. Outsource the struggle. For effective debt recovery services, try TrueAccord or InvoiceCare.


Is there anything worse than begging for something that’s yours? As creators, we invest our very best to solve our client’s problems, and should expect a minimum level of appreciation from them. This appreciation comes in various forms, but only one can literally feed us: payment. At the very least, we should expect them to hold up to their end of the deal and pay the right fees on the right dates. Try these tactics and let us know if they work out for you. (Oh, and feel free to print out a poster version of these tips!)

GuidetoGettingPaid_Poster


Know any other secrets to get paid on time? By all means share!


Products Seen In This Post:


getpaidtowrite-banner
Charge Your Worth: The Complete Guide to Getting Paid

Friday, April 24, 2015

Freelancers, Stop Getting Burned by Your Clients


It seems like every designer has a horror story or two (or seventeen) about getting ripped off by a client who refuses to pay.


Once it happens, there’s not too much you can do. It sucks, but it’s the simple truth.


If you didn’t get a contract or a clear payment process established in the beginning, a lot of the time you’re just going to have to eat the loss. You can’t sue someone without a legally binding document, so the only thing you can do is plead, pester, threaten, or try something possibly illegal like a CSS kill switch (only use this in extreme circumstances!). That ain’t a pretty picture.


You Got Screwed – Now What?


You’re probably going to want to slap me for this, but I’m going to say it anyway: I suggest learning from your mistake and preparing to do things better next time. I think I may be turning into the agony aunt of the design community: “Learn from your mistakes!” “A penny saved is a penny earned!” “Don’t eat your dessert with a salad fork – what are you, some kind of barbarian?”


But really, it’s often the only thing you can do if you find yourself in an unfortunate money situation with a client. Perhaps you can’t afford to hire a lawyer or debt collection agency to get your money back from the jerks who stiffed you (although if you can, it can be a good “last straw” solution for a really stubborn client). After you stomp and wave your arms at your cat and/or spouse, it’s time to draw up Plan B.


young angry man
Image Source: Young Angry Man via Shutterstock.


The bright side to dealing with deadbeat clients is that there’s always a next time. And what should be the first thing you do with your next client? Negotiate. There are plenty of resources if you need some tips on how to negotiate a client contract, like this one or this one.


But since getting paid has been an issue for you recently, I would start by getting an upfront deposit, ideally 50% if possible. Yes, it can be awkward and require some negotiating skills. But is a little awkwardness really worse than getting stiffed again? I think it’s preferable to letting someone get away with being unprofessional and terrible to you.


Choose Your Clients Well. I Mean It.


You should be picking your clients as carefully as you would pick the person you want to marry. It sounds weird until you actually think about it – you’re entering into a relationship with this person. Relationships have rules and each person has a responsibility to clearly communicate their needs to the other person.


Don’t try to make a bad client into a good one; as I’ve mentioned in previous articles, it will never work out. Ever. Any client who exhibits the telltale signs of crappiness is only going to get worse and worse as a project drags on. You know this already. Don’t do it to yourself. Prevention over cure is always the best way.


Don’t Give Them A Reason To Get Annoyed


Let’s be honest here. Designers aren’t always noble warriors of integrity, put upon constantly by big, bad clients looking to rob them blind. I know because I’ve hired them. There’s rarely an excuse for non-payment, but sometimes, a designer’s conduct can leave a client desperately looking for one.


What do I mean by this? Oftentimes, designers are genuinely unaware of how they’re coming across to their clients, and believe that a particular client’s decision to get funny with the money comes out of nowhere, when in fact, the designer has been communicating poorly, or sometimes not at all.


I promise I’m not going to start attacking designers (I’m a designer too), since I know the industry is full of hardworking folks with integrity, but I’ve hired some people who were just flat out unprofessional no matter which way you cut it. I always paid, in full and on time, but boy did I feel crummy about it sometimes.


Businessman Writing the Word Ethics
Image Source: Ethics via Shutterstock.


One designer who shall remain nameless and genderless actually took an unannounced, four-day ski trip with their significant other right in the middle of the work week! I couldn’t reach them at all; my messages and emails were met with dead silence. For four days – a week before deadline. I was so shocked I couldn’t even think of what to say when they returned, all rosy-cheeked and oblivious (oh, how shall I fire thee? Let me count the ways).


Of course, that’s an extreme example, and I’m sure none of you here would ever do something like that. But I wanted to provide a bit of context for those who might not realize that their actions are aggravating a client who has appeared perfectly reasonable up until now. Probably the biggest issue I have with many freelancers, as a client, is that they over-promise and under-deliver.


Too Much Confidence


Under-promise and over-deliver. Always. Never the other way around. I can’t tell you how many times I’ve hired designers who claimed they’d have a website ready for me in some ridiculously short amount of time, and then not only failed, but failed spectacularly to do so.


Instead of the “48 hour” or “3-days, max” ETAs I was promised, I waited for weeks; sometimes even months, before I got any work. It was dreadful. Eventually I got smart, and learned to stop working with designers who made impossible claims, because 99.9% of the time, people who promise you the moon end up delivering nothing but stinky cheese.


Man in front of a plate with cheese under cheese cover labelled Warning: Smelly Cheese
Image Source: Just Some Smelly Cheese via Shutterstock.


Designers, if you make wildly extravagant claims to prospective clients, you are shooting yourselves in the foot. Even if you think the time period you’ve given is “reasonable,” it’s usually not, and you’ll end up grossly underestimating the time it will take you to complete a task. You’ll be attracting all the wrong kinds of clients to yourself, and driving away all the right ones.


Good clients know that if something sounds too good to be true, it usually is. Be honest with yourself and figure out how long it’s actually going to take you to complete a project. Then multiply that number by three. That’s the time period you give to your client. Then make sure you finish under that time. Under. Not over, guys. Seriously.


On Time, Every Time


Okay, time to switch back over to freelancer mode. As a freelancer, I have never had a client who refused to pay me, or who was abnormally late with payment. Why? Perhaps some of that is due to luck – sometimes a payment issue can truly come out of left field. It’s happened to big name designers as well as the little guys. Mostly, though, I believe my 100% payment success rate is due to me always taking the same precautions I’ve outlined for you today.


I never work with anyone I feel sketchy about, and you shouldn’t either. Don’t be so desperate for work that you’re willing to overlook a client’s red flags. Draw up a set of non-negotiable rules in your contract, and (this is important) stick to them no matter what. It doesn’t matter if you’re doing business with your grandmother, your head or state, or your pet bullfrog – if any prospective client complains about the rules, politely show them the door. You work hard enough for your income. Don’t work even harder just to get it in your bank account.


What Do You Think


How do you fare when it comes to collecting payment from your clients? What precautions do you take to ensure you get paid?


The post Freelancers, Stop Getting Burned by Your Clients appeared first on Speckyboy Web Design Magazine.


Freelancers, Stop Getting Burned by Your Clients

Friday, February 13, 2015

Getting Started With Gulp.js

guide to gulp.js


In this article we’ll look at the basics of using Gulp — from installation to basic syntax and a couple of examples. By the end of the article you should be able to find, install and use packages that others have created for Gulp to compile SASS, optimize images, create sprites, concatenate files, and more!


Installing Gulp


Don’t worry, installation is very easy. We’ll need to use the terminal in OSX and Linux, or the command prompt for Windows. I’ll be referring to it as Terminal from now on.


Open it up and type npm -v and press enter. If you see version number displayed you have Node installed already — this is a dependency for Gulp.


If you get a "command not found" (or a similar error), head on down to the Node.js downloads page and select the appropriate package for your system. Once installed, the npm command will be available in the terminal.


Installing Gulp is just as easy. Paste the following command into the terminal, that’s it:


npm install --global gulp

This will install the Gulp command which will be available globally on your system.


Adding Gulp To A Project


Gulp is now installed, but we’ll need to add it to each project we need it for, separately. Create an empty folder now and navigate to it in your terminal. While in the folder for the project, use the following command:


npm install --save-dev gulp

This should create a node_modules folder and an npm-debug.log file in your project folder. These are used by Gulp to do its thing to your project, you don’t need to think about them at this stage.


The reason we need to add Gulp to each specific project is that each project has different requirements. One may call for SASS, another for Less. One may use Coffeescript, the other may not, and so on.


The Gulpfile


The Gulpfile is where the magic happens, it’s where you define the automations you require and when you want them to happen. Let’s create an empty default task by creating a file named gulpfile.js and pasting the following code into it.


var gulp = require("gulp");

gulp.task("default", function()
// This does nothing for now, we"ll add functionality soon
);

Once this file is saved you can go back to your terminal and run the gulp command on its own. Gulp detects which project it is in and runs the default task — the one we just created. You should see something like this:


Nothing really happens here, since the task is empty, but it is working fine. Now, let’s get going with some proper examples!


Copying A File


This is a boring one, I’ll admit as much, but it will help you understand what’s going on easily.


In your project folder create a file named to_copy.txt , and a folder named dev. Let’s go into our Gulpfile and create a new task named copy.


gulp.task("copy", function() 
return gulp.src("to_copy.txt")
.pipe(gulp.dest("dev"));
);

The first line defines a task that is named copy. Within this we use gulp.src to specify which files we are targeting with this task — in this case it is a single file named to_copy.txt.


We then pipe these files to the gulp.dest function which specifies where we want to put these files — I’ve used the dev directory.


Go back to your terminal and type gulp copy to run this task, it should copy the specified file to the specified directory, something like this:


The pipe command is at the heart of Gulp. It is an efficient way to move data between commands. The src command specifies the files which are piped to the dest command. In more complex scenarios we would pipe our files to other commands before specifying a destination.


You should also be aware that the source can be given as a single file, or multiple files. If we have a folder named production and we want to move all files from our development folder into it, we could use the following command:


gulp.task("copy", function() 
return gulp.src("development/*")
.pipe(gulp.dest("production"));
);

The star character will match anything within the directory. You could also match all files within all subdirectories, and do all sorts of other fancy matching. Take a look at the node-glob documentation for more info.


Compiling SASS


Compiling a stylesheet out of SASS files is a common task for developers. It can be done with Gulp pretty easily, we’ll need to do some preparation though. Apart from basic commands such as src, dest and a number of others, all functionality is added via third party addons. Here’s how I go about using them.


I type SASS Gulp into Google, the first result is usually what I need, you should find the page for the SASS package. It shows you how to install it (npm install gulp-sass). Chances are you’ll need to use sudo to install it as an administrator, so it will probably be (sudo npm install gulp-sass) .


Once done, you can use the syntax the package dictates to compile your code. To do this, create a file named styles.scss with the following content:


$primary: #ff9900;
body
background: $primary;

Now create the following Gulp task in the Gulpfile.


gulp.task("sass", function () 
gulp.src("*.scss")
.pipe(sass())
.pipe(gulp.dest("./css"));
);

Before running the command, don’t forget to ‘require’ the package at the top of the Gulpfile like this:


var sass = require("gulp-sass");

When you run grunt sass, all files with the scss extension will be piped to the sass function, which will convert them to css. These are then piped to the destination function which places them in the css folder.


Watching Files And Folders


So far this is all handy, but we still need to type a command each time we want to run a task, which isn’t very efficient, especially when it comes to stylesheet changes. Gulp allows you to watch files for changes and run commands automatically.


In the Gulpfile, create a command named automate which will use the watch command to watch a set of files for changes, and run a specific command when a file changes.


gulp.task(‘automate", function() 
gulp.watch("*.scss", ["sass"]);
);

If you type gulp automate into the terminal, it will start and finish the task, but it won’t return to the prompt because it is monitoring for changes. We’ve specified that we want to watch all scss files in the root directory and if they change, we want to run the sass command that we’ve set up previously.


If you now change your style.scss file it should be compiled to the css file within the css directory automatically.


Running Multiple Tasks


There are many situations where you might want to run multiple tasks. When watching your javascript folder you may want to compile concatenate two files and then proceed to minify them. There are two ways you can get this done.


If tasks are related, I like to chain them. A good example would be the concatenation and minification of javascript files. We first pipe our files to the concat action, then pipe them to gulp-uglify, then use the destination function to output them.


If tasks are unrelated you could call multiple tasks. An example would be a task where we want to concatenate and minify our scripts and also compile our SASS. Here’s he full Gulpfile of how that would look.


var gulp = require("gulp");
var uglify = require("gulp-uglify");
var concat = require("gulp-concat");
var sass = require("gulp-sass");

gulp.task("scripts", function()
gulp.src("js/**/*.js")
.pipe(concat("scripts.js"))
.pipe(gulp.dest("."))
.pipe(uglify())
.pipe(gulp.dest("."))
);

gulp.task("styles", function()
gulp.src("/*.scss")
.pipe(sass())
.pipe(gulp.dest("./css"));
);

gulp.task("automate", function()
gulp.watch(["*.scss", "js/**/*.js"], ["scripts", "styles"]);
);


gulp.task("default", ["scripts", "styles"]);

If you type gulp scripts into the terminal, all javascript files within the js directory will be concatenated, output to the main directory, then uglified and saved to the main directory.


If you type gulp sass, all your scss files will be compiled and saved to the css directory.


If you type gulp (the default task), your scripts task will be run, followed by your styles task.


The gulp automate task watches multiple folders for changes in our scss and js files and will perform both tasks we’ve defined, if a change is detected.


Overview


Using Gulp is not difficult, in fact, many people prefer it over Grunt because of its simpler syntax. Remember the steps to take when creating a new automation:


  • Search for plugin

  • Install plugin

  • Require plugin in your Gulpfile

  • Use the syntax in the documentation

The five commands available in Gulp (task, run, watch, src, dest) are the only ones you need to know, all third party addons have great documentation. Here’s a list of some things I use which you could get started with right now:


Getting Started With Gulp.js

Getting Started With Gulp.js

guide to gulp.js


In this article we’ll look at the basics of using Gulp — from installation to basic syntax and a couple of examples. By the end of the article you should be able to find, install and use packages that others have created for Gulp to compile SASS, optimize images, create sprites, concatenate files, and more!


Installing Gulp


Don’t worry, installation is very easy. We’ll need to use the terminal in OSX and Linux, or the command prompt for Windows. I’ll be referring to it as Terminal from now on.


Open it up and type npm -v and press enter. If you see version number displayed you have Node installed already — this is a dependency for Gulp.


If you get a "command not found" (or a similar error), head on down to the Node.js downloads page and select the appropriate package for your system. Once installed, the npm command will be available in the terminal.


Installing Gulp is just as easy. Paste the following command into the terminal, that’s it:


npm install --global gulp

This will install the Gulp command which will be available globally on your system.


Adding Gulp To A Project


Gulp is now installed, but we’ll need to add it to each project we need it for, separately. Create an empty folder now and navigate to it in your terminal. While in the folder for the project, use the following command:


npm install --save-dev gulp

This should create a node_modules folder and an npm-debug.log file in your project folder. These are used by Gulp to do its thing to your project, you don’t need to think about them at this stage.


The reason we need to add Gulp to each specific project is that each project has different requirements. One may call for SASS, another for Less. One may use Coffeescript, the other may not, and so on.


The Gulpfile


The Gulpfile is where the magic happens, it’s where you define the automations you require and when you want them to happen. Let’s create an empty default task by creating a file named gulpfile.js and pasting the following code into it.


var gulp = require("gulp"); gulp.task("default", function() // This does nothing for now, we"ll add functionality soon );

Once this file is saved you can go back to your terminal and run the gulp command on its own. Gulp detects which project it is in and runs the default task — the one we just created. You should see something like this:


Nothing really happens here, since the task is empty, but it is working fine. Now, let’s get going with some proper examples!


Copying A File


This is a boring one, I’ll admit as much, but it will help you understand what’s going on easily.


In your project folder create a file named to_copy.txt , and a folder named dev. Let’s go into our Gulpfile and create a new task named copy.


gulp.task("copy", function() return gulp.src("to_copy.txt") .pipe(gulp.dest("dev")); );

The first line defines a task that is named copy. Within this we use gulp.src to specify which files we are targeting with this task — in this case it is a single file named to_copy.txt.


We then pipe these files to the gulp.dest function which specifies where we want to put these files — I’ve used the dev directory.


Go back to your terminal and type gulp copy to run this task, it should copy the specified file to the specified directory, something like this:


The pipe command is at the heart of Gulp. It is an efficient way to move data between commands. The src command specifies the files which are piped to the dest command. In more complex scenarios we would pipe our files to other commands before specifying a destination.


You should also be aware that the source can be given as a single file, or multiple files. If we have a folder named production and we want to move all files from our development folder into it, we could use the following command:


gulp.task("copy", function() return gulp.src("development/*") .pipe(gulp.dest("production")); );

The star character will match anything within the directory. You could also match all files within all subdirectories, and do all sorts of other fancy matching. Take a look at the node-glob documentation for more info.


Compiling SASS


Compiling a stylesheet out of SASS files is a common task for developers. It can be done with Gulp pretty easily, we’ll need to do some preparation though. Apart from basic commands such as src, dest and a number of others, all functionality is added via third party addons. Here’s how I go about using them.


I type SASS Gulp into Google, the first result is usually what I need, you should find the page for the SASS package. It shows you how to install it (npm install gulp-sass). Chances are you’ll need to use sudo to install it as an administrator, so it will probably be (sudo npm install gulp-sass) .


Once done, you can use the syntax the package dictates to compile your code. To do this, create a file named styles.scss with the following content:


$primary: #ff9900; body background: $primary; 

Now create the following Gulp task in the Gulpfile.


gulp.task("sass", function () gulp.src("*.scss") .pipe(sass()) .pipe(gulp.dest("./css")); );

Before running the command, don’t forget to ‘require’ the package at the top of the Gulpfile like this:


var sass = require("gulp-sass");

When you run grunt sass, all files with the scss extension will be piped to the sass function, which will convert them to css. These are then piped to the destination function which places them in the css folder.


Watching Files And Folders


So far this is all handy, but we still need to type a command each time we want to run a task, which isn’t very efficient, especially when it comes to stylesheet changes. Gulp allows you to watch files for changes and run commands automatically.


In the Gulpfile, create a command named automate which will use the watch command to watch a set of files for changes, and run a specific command when a file changes.


gulp.task(‘automate", function() gulp.watch("*.scss", ["sass"]); );

If you type gulp automate into the terminal, it will start and finish the task, but it won’t return to the prompt because it is monitoring for changes. We’ve specified that we want to watch all scss files in the root directory and if they change, we want to run the sass command that we’ve set up previously.


If you now change your style.scss file it should be compiled to the css file within the css directory automatically.


Running Multiple Tasks


There are many situations where you might want to run multiple tasks. When watching your javascript folder you may want to compile concatenate two files and then proceed to minify them. There are two ways you can get this done.


If tasks are related, I like to chain them. A good example would be the concatenation and minification of javascript files. We first pipe our files to the concat action, then pipe them to gulp-uglify, then use the destination function to output them.


If tasks are unrelated you could call multiple tasks. An example would be a task where we want to concatenate and minify our scripts and also compile our SASS. Here’s he full Gulpfile of how that would look.


var gulp = require("gulp"); var uglify = require("gulp-uglify"); var concat = require("gulp-concat"); var sass = require("gulp-sass"); gulp.task("scripts", function() gulp.src("js/**/*.js") .pipe(concat("scripts.js")) .pipe(gulp.dest(".")) .pipe(uglify()) .pipe(gulp.dest(".")) ); gulp.task("styles", function() gulp.src("/*.scss") .pipe(sass()) .pipe(gulp.dest("./css")); ); gulp.task("automate", function() gulp.watch(["*.scss", "js/**/*.js"], ["scripts", "styles"]); ); gulp.task("default", ["scripts", "styles"]);

If you type gulp scripts into the terminal, all javascript files within the js directory will be concatenated, output to the main directory, then uglified and saved to the main directory.


If you type gulp sass, all your scss files will be compiled and saved to the css directory.


If you type gulp (the default task), your scripts task will be run, followed by your styles task.


The gulp automate task watches multiple folders for changes in our scss and js files and will perform both tasks we’ve defined, if a change is detected.


Overview


Using Gulp is not difficult, in fact, many people prefer it over Grunt because of its simpler syntax. Remember the steps to take when creating a new automation:


  • Search for plugin

  • Install plugin

  • Require plugin in your Gulpfile

  • Use the syntax in the documentation

The five commands available in Gulp (task, run, watch, src, dest) are the only ones you need to know, all third party addons have great documentation. Here’s a list of some things I use which you could get started with right now:


Getting Started With Gulp.js

Getting Started with Micro UX: a Simple Guide & 5 Fascinating Examples

Designer Charles Eames once said “The details are not the details. They make the design.” In line with this idea, many designers have started to change the way they think about user experience. Instead of looking at the big picture and mapping out the entire user journey, a new approach called Micro UX flips the experience design process on its head. In this article, you’ll learn what Micro UX is, how it can improve your designs, and five ways to incorporate it brilliantly.


What is Micro UX?


Many designers tackle UX with a sort of big-to-small approach. That is, they think of a fundamental concept for a design or site, analyze what the end user will want to do, and consider how they can facilitate these tasks. Micro UX actually reverses that process, looking at projects with a small-to-big approach. It involves thinking about the smallest details of the design first, and assembling those to create the bigger picture.


When designing with Micro UX in mind, think about how a user will interact with specific functions on the site rather than the general motivation to use it. Start out with individual aesthetic or functional elements that you know you want to incorporate into the site, and assemble those smaller elements in order to create the bigger, more complete design. Designers and developers focusing on Micro UX may go into a design without the complete picture in mind and let the small details determine the outcome of the overall product.


Micro Vs. Macro UX


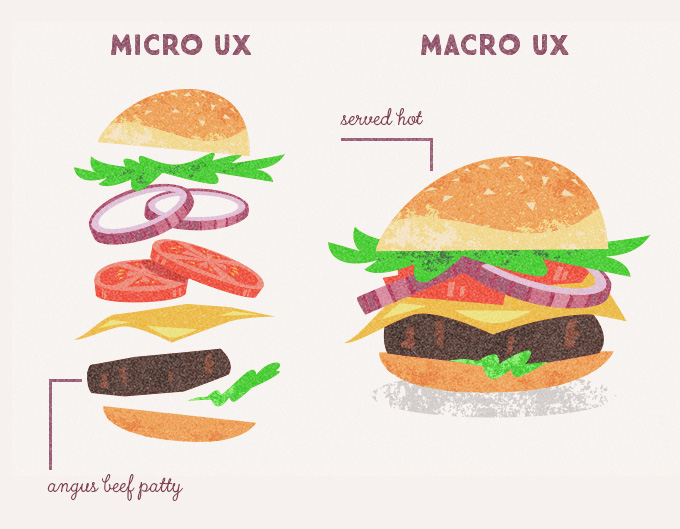
To understand how Micro UX relates to Macro UX, consider cooking burgers. Facing the challenge with a Macro UX approach, you would concentrate on planning out the experience of a full, flavorful bite. You would probably worry about things like finding toothpicks to hold the whole thing together, and making sure that burgers are served hot off the grill.


Focusing on Micro UX, on the other hand, would make you think in terms of individual ingredients. You’d work hard on finding the best available beef (perhaps angus?), whipping up a distinctive sauce, or even baking the buns yourself. Your beef patty may be so special that people end up eating it without a bun! In Micro UX we focus on making each small component delightful, attractive and innovative so that the user’s experience as a whole may exceed his or her expectations.


As you’ve probably realized, the general plan for this experience is just as important as the detailed surprises found in each component. That’s why integrating Macro and Micro UX is one of our greatest opportunities as designers. It is also a challenge that certainly brings rewards in terms of user satisfaction.


Micro UX vs. Macro UX example


When Is Micro UX More Useful?


Sometimes it might make more sense to focus on Micro UX. Going back to the burger example, what if you weren’t sure what the final product should look like? As far as you’re concerned, this could easily become a sandwich along the way. In that case, focusing on the quality of the ingredients might be a better approach. Think about it: if you shift all your efforts to perfecting the individual parts (i.e. making an amazing bun or special sauce), wouldn’t the final product, whatever that is, end up tasting better?


This approach is particularly useful with new, innovative projects – ones whose audience is not predetermined and the level of use and success is unknown. It’s also a great choice for a new website or product that is aimed at competing with or supplanting an existing one. In this case, the site can take the basic form of that of a competitor and improve on its details. Finally, it’s a great choice for any site that needs to be updated but not overhauled. Approaching a site with a Micro UX approach can allow small, noticeable improvements to be made without overhauling a system that has already been proven to work.


Micro UX in Action


Micro UX Example in the Mugatu WordPress Theme


This map marker’s animation calls the user’s attention to the company’s location. Despite being subtle, it does manage to stand out in the one-page flow of the Mugatu Business Theme for WordPress.


Micro UX Example in the Conference WordPress Theme


There are many ways to present a speaker schedule, but the way this table was crafted certainly makes it easier for the viewer to navigate time slots, talk descriptions and event dates. From the Conference WordPress Theme.


Micro UX Example in the Scorilo WordPress Theme


This accordion layout makes the job of looking for an answer much easier. Frequently asked questions are grouped by topic, and the user can quickly read each answer by clicking on the plus sign. Found in Scorilo for WordPress.


Micro UX Example in the Hagu WordPress Theme


A well-thought-out typographic treatment can dramatically improve a user’s experience with our site’s content. In this case, the Hagu theme features drop caps and other exquisite details.


Micro UX Example in the PTS Goodnight Prestashop Theme


This rich mega-menu features quick product descriptions, vivid imagery and a clear emphasis on price reductions. Online shoppers will find this seemingly small detail very useful when trying to find a few products to focus on. Found on the PTS Goodnight Prestashop theme.


Use Micro UX Wisely


There is certainly a growing focus in the industry on Micro UX, and designers will have to incorporate it in order to set themselves and their products apart. However, an ideal solution is that where Macro and Micro UX work together to ensure that a user gets what he or she wants out of the product, but is also blown away by its tiny, easy-to-use and aesthetically pleasing details.


PS – Did you think the animated GIFs above made a difference? That’s Micro UX in action!


Images created using Burger Vector Illustration, iPhone 5 + Sketchbook – Mockup # 1 and the True North Font Pack.


Getting Started with Micro UX: a Simple Guide & 5 Fascinating Examples