Showing posts with label Started. Show all posts

Saturday, June 13, 2015

Get Out and Teach: How to Get Started Tutoring Art and Design

So, you’re a freelancer whose work has been coming in a little slow lately. Or a career artist who could use another way to monetize your talents. Or just a designer who’d like to help propagate your talents throughout the world. Why not get a side gig teaching?


Figuring out the best way to go about it is a multi-step process that can be looked at from several angles. But no matter how you choose to approach it, first, you have to figure out…


What to Teach


If you already know this, you’ve got a head start. If not, take a look at your skill set.


In a field as large and diverse as the arts, it can be hard just to figure out what you want to teach, or how much to specialize. In fact, I’d go as far as to say that it’s rare for an artist to have just one talent.


Do you have a primary talent? One that pays the bills and puts food on the table? If so, teaching that is a solid bet, if not the most exciting. If not, what’s your passion? The dedication you put into learning it might make you an excellent teacher, if you’ve gotten far enough along to be comfortable passing it on to other people.


There are more practical considerations, though. First of all, what does the market want? Web design and development skills are always in high-demand. Stamp collecting… less so. If you’re dedicated, you can still find students for it, but it might not be the fastest way to a paycheck.


In addition, consider the cost of materials. Can you provide them for your students, or do they need to buy their own? And if you provide them, factor that into the overall cost of your tutoring. Is the fee you’ll get still worth it?


Who to Teach


teaching-1


This may be pre-determined by what you’re teaching: it’s not likely that preschoolers will need to learn Photoshop. But with every skill you’re teaching, there will be several demographics you can teach it to and several target markets within those demographics.


Would you prefer to hone the skills of your peers? Teaching to other artists and designers can be an interesting way to improve your own job skills and stay on the cutting-edge with the tools and programs you’ll end up using yourself.


This is far from the only option though. If you’re teaching traditional art, the demographics you can work with are blown wide open. Drawing, painting, and crafting are hobbies for people of all ages, so you might find yourself teaching kids in daycare how to use scissors properly, getting into figure drawing and anatomy with high-schoolers, or helping seniors relearn how to paint.


The age range and walk of life you choose to focus on will in large part determine how you’ll structure your business and market to your target demographic, so it’s important to make a decision early on.


Finally, do you feel comfortable working with groups, or would you rather teach one on one? We’ll cover the difference between them more when we talk about making a curriculum.


“But What Education Do I Need?”


If you have a degree, you have a leg up. However, in the words of EmptyEasel’s Charlotte DeMolay, “If you don’t have [one], but you’ve been a practicing artist for several years you may still be able to teach.”.


Your portfolio can be just as good at opening doors as a degree, and so can references. If you’ve had art teachers in the past, contact them and see if they’re willing to provide you with a reference. The same goes for co-workers from any current or previous jobs related to what you’re teaching, or satisfied clients from any related freelance assignments.


Testimonials mean a lot when it comes to services, and none more so than education. It’s easier for customers to believe you’re good when they hear it from the mouth of an unbiased real person. This is especially true if it’s another teacher, especially if you’re working with school-age students, making your primary clientele their parents.


When it comes to the education you need to teach the class itself, a willingness to continue learning and growing according to your students’ needs is worth more than a doctorate. Constantly research and brush up on your own technique, and you’ll be able to teach much more effectively and confidently than anyone who’s let themselves fall out of practice.


Finding a Space


teaching-1


In Real Life


If you ever hope to make this a serious source of income, find a better space than the kitchen table. While that can work for one student at a time, you’ll need to expand if you’re going to be teaching any more than that.


This is where networking comes into play again, and your best resource might just be other teachers. However, also look for community centers in your area. You might just be able to teach a summer course with them instead of having to advertise for yourself. But Other great resources include local libraries, community or technical colleges, and even small (especially independently-run) museums. When classes are out, or they have empty time slots, you can request to rent the space independently.


If not… There are always bookstores and cafes if you’re going to be teaching a small group, preferably of digital artists.


Online


There are tons of sites that let you sell video tutorials to crowds of online students. For example…


  • Skillshare charges subscribers a low monthly fee to take unlimited classes via video. No teaching experience is needed to join them.


  • For the more entrepreneurial of us, there’s Udemy, another video tutorial site that takes less of a fee and has fewer barriers to entry, but in exchange, makes you market your courses yourself and puts you up against stiffer competition.


  • Lynda constantly accepts applications for trainers, and lets them create courses for a variety of subjects related to visual arts and design.


If you’re doing one-on-one teaching online, you may find that you only need Skype or TeamViewer to screen-share and guide your student in their desired program.


Marketing


Many of the marketing options are pretty obvious: print out flyers and pop them up around town, put up ads on Craigslist and in local publications, spread the word around to your friends, and so on.


Teachers of all stripes, however, might just find a secret weapon in the Marsupial Method, developed by entrepreneur Daniel DiPiazza in his days tutoring math. In short, you connect with people who are selling something similar to your target audience, but not so similar that you’re in direct competition with them, then set up a program of co-recommendations.


For example, if you teach digital painting, you can hook up with someone who teaches traditional painting and have them tell their students that if they’re interested in moving on to tablets, they can ring you up. In exchange, do the same for them. You’ll be surprised how much this can benefit the both of you.


Making a Curriculum


Once you have a client, or a class, it’s time to build a curriculum.


Before your first class, it’s a good idea to correspond with your student(s), either remotely or in person, and ask them what their goals are in taking your class.


When you jump into the course, start with the basics. Even if you don’t think your student needs a refresher on them, start with them anyway. This will also be your chance to judge your students’ skill level and adjust your plans accordingly.


For your next classes, try to set goals for each session, but flexibility is key here. Your students may surprise you or frustrate you, but as a teacher, you need to be prepared to change according to their needs. Throughout the process, make sure you keep the end in mind and give them some way to keep learning when you’re not around. Setting goals and creating homework is vital to keep your students engaged.


However, keep these open-ended too. You may need to change your expectations as your students progress through the course.


The Teaching Process


Teaching may be one of the most difficult professions, but it’s also one of the most rewarding.


It’s important to stay positive. No matter what age or skill level you’re teaching, make sure to give plenty of positive feedback. And when you run into problems, which you will, keep learning yourself. There are always more techniques, more teaching styles, and more creative solutions to implement.


It can be a difficult change, but if you get good enough, it can be great both as a source of income and a networking opportunity for future projects and jobs. You never know: the parent who hires you today to teach their kid might want a painting for the living room. Or the community center whose room you rent might need a run of flyers, a new website, or even a mural. So keep your head up, stick with it, and happy tutoring!


Products Seen In This Post:



getpaidtowrite-banner
Get Out and Teach: How to Get Started Tutoring Art and Design

Friday, February 13, 2015

Getting Started With Gulp.js

guide to gulp.js


In this article we’ll look at the basics of using Gulp — from installation to basic syntax and a couple of examples. By the end of the article you should be able to find, install and use packages that others have created for Gulp to compile SASS, optimize images, create sprites, concatenate files, and more!


Installing Gulp


Don’t worry, installation is very easy. We’ll need to use the terminal in OSX and Linux, or the command prompt for Windows. I’ll be referring to it as Terminal from now on.


Open it up and type npm -v and press enter. If you see version number displayed you have Node installed already — this is a dependency for Gulp.


If you get a "command not found" (or a similar error), head on down to the Node.js downloads page and select the appropriate package for your system. Once installed, the npm command will be available in the terminal.


Installing Gulp is just as easy. Paste the following command into the terminal, that’s it:


npm install --global gulp

This will install the Gulp command which will be available globally on your system.


Adding Gulp To A Project


Gulp is now installed, but we’ll need to add it to each project we need it for, separately. Create an empty folder now and navigate to it in your terminal. While in the folder for the project, use the following command:


npm install --save-dev gulp

This should create a node_modules folder and an npm-debug.log file in your project folder. These are used by Gulp to do its thing to your project, you don’t need to think about them at this stage.


The reason we need to add Gulp to each specific project is that each project has different requirements. One may call for SASS, another for Less. One may use Coffeescript, the other may not, and so on.


The Gulpfile


The Gulpfile is where the magic happens, it’s where you define the automations you require and when you want them to happen. Let’s create an empty default task by creating a file named gulpfile.js and pasting the following code into it.


var gulp = require("gulp");

gulp.task("default", function()
// This does nothing for now, we"ll add functionality soon
);

Once this file is saved you can go back to your terminal and run the gulp command on its own. Gulp detects which project it is in and runs the default task — the one we just created. You should see something like this:


Nothing really happens here, since the task is empty, but it is working fine. Now, let’s get going with some proper examples!


Copying A File


This is a boring one, I’ll admit as much, but it will help you understand what’s going on easily.


In your project folder create a file named to_copy.txt , and a folder named dev. Let’s go into our Gulpfile and create a new task named copy.


gulp.task("copy", function() 
return gulp.src("to_copy.txt")
.pipe(gulp.dest("dev"));
);

The first line defines a task that is named copy. Within this we use gulp.src to specify which files we are targeting with this task — in this case it is a single file named to_copy.txt.


We then pipe these files to the gulp.dest function which specifies where we want to put these files — I’ve used the dev directory.


Go back to your terminal and type gulp copy to run this task, it should copy the specified file to the specified directory, something like this:


The pipe command is at the heart of Gulp. It is an efficient way to move data between commands. The src command specifies the files which are piped to the dest command. In more complex scenarios we would pipe our files to other commands before specifying a destination.


You should also be aware that the source can be given as a single file, or multiple files. If we have a folder named production and we want to move all files from our development folder into it, we could use the following command:


gulp.task("copy", function() 
return gulp.src("development/*")
.pipe(gulp.dest("production"));
);

The star character will match anything within the directory. You could also match all files within all subdirectories, and do all sorts of other fancy matching. Take a look at the node-glob documentation for more info.


Compiling SASS


Compiling a stylesheet out of SASS files is a common task for developers. It can be done with Gulp pretty easily, we’ll need to do some preparation though. Apart from basic commands such as src, dest and a number of others, all functionality is added via third party addons. Here’s how I go about using them.


I type SASS Gulp into Google, the first result is usually what I need, you should find the page for the SASS package. It shows you how to install it (npm install gulp-sass). Chances are you’ll need to use sudo to install it as an administrator, so it will probably be (sudo npm install gulp-sass) .


Once done, you can use the syntax the package dictates to compile your code. To do this, create a file named styles.scss with the following content:


$primary: #ff9900;
body
background: $primary;

Now create the following Gulp task in the Gulpfile.


gulp.task("sass", function () 
gulp.src("*.scss")
.pipe(sass())
.pipe(gulp.dest("./css"));
);

Before running the command, don’t forget to ‘require’ the package at the top of the Gulpfile like this:


var sass = require("gulp-sass");

When you run grunt sass, all files with the scss extension will be piped to the sass function, which will convert them to css. These are then piped to the destination function which places them in the css folder.


Watching Files And Folders


So far this is all handy, but we still need to type a command each time we want to run a task, which isn’t very efficient, especially when it comes to stylesheet changes. Gulp allows you to watch files for changes and run commands automatically.


In the Gulpfile, create a command named automate which will use the watch command to watch a set of files for changes, and run a specific command when a file changes.


gulp.task(‘automate", function() 
gulp.watch("*.scss", ["sass"]);
);

If you type gulp automate into the terminal, it will start and finish the task, but it won’t return to the prompt because it is monitoring for changes. We’ve specified that we want to watch all scss files in the root directory and if they change, we want to run the sass command that we’ve set up previously.


If you now change your style.scss file it should be compiled to the css file within the css directory automatically.


Running Multiple Tasks


There are many situations where you might want to run multiple tasks. When watching your javascript folder you may want to compile concatenate two files and then proceed to minify them. There are two ways you can get this done.


If tasks are related, I like to chain them. A good example would be the concatenation and minification of javascript files. We first pipe our files to the concat action, then pipe them to gulp-uglify, then use the destination function to output them.


If tasks are unrelated you could call multiple tasks. An example would be a task where we want to concatenate and minify our scripts and also compile our SASS. Here’s he full Gulpfile of how that would look.


var gulp = require("gulp");
var uglify = require("gulp-uglify");
var concat = require("gulp-concat");
var sass = require("gulp-sass");

gulp.task("scripts", function()
gulp.src("js/**/*.js")
.pipe(concat("scripts.js"))
.pipe(gulp.dest("."))
.pipe(uglify())
.pipe(gulp.dest("."))
);

gulp.task("styles", function()
gulp.src("/*.scss")
.pipe(sass())
.pipe(gulp.dest("./css"));
);

gulp.task("automate", function()
gulp.watch(["*.scss", "js/**/*.js"], ["scripts", "styles"]);
);


gulp.task("default", ["scripts", "styles"]);

If you type gulp scripts into the terminal, all javascript files within the js directory will be concatenated, output to the main directory, then uglified and saved to the main directory.


If you type gulp sass, all your scss files will be compiled and saved to the css directory.


If you type gulp (the default task), your scripts task will be run, followed by your styles task.


The gulp automate task watches multiple folders for changes in our scss and js files and will perform both tasks we’ve defined, if a change is detected.


Overview


Using Gulp is not difficult, in fact, many people prefer it over Grunt because of its simpler syntax. Remember the steps to take when creating a new automation:


  • Search for plugin

  • Install plugin

  • Require plugin in your Gulpfile

  • Use the syntax in the documentation

The five commands available in Gulp (task, run, watch, src, dest) are the only ones you need to know, all third party addons have great documentation. Here’s a list of some things I use which you could get started with right now:


Getting Started With Gulp.js

Getting Started With Gulp.js

guide to gulp.js


In this article we’ll look at the basics of using Gulp — from installation to basic syntax and a couple of examples. By the end of the article you should be able to find, install and use packages that others have created for Gulp to compile SASS, optimize images, create sprites, concatenate files, and more!


Installing Gulp


Don’t worry, installation is very easy. We’ll need to use the terminal in OSX and Linux, or the command prompt for Windows. I’ll be referring to it as Terminal from now on.


Open it up and type npm -v and press enter. If you see version number displayed you have Node installed already — this is a dependency for Gulp.


If you get a "command not found" (or a similar error), head on down to the Node.js downloads page and select the appropriate package for your system. Once installed, the npm command will be available in the terminal.


Installing Gulp is just as easy. Paste the following command into the terminal, that’s it:


npm install --global gulp

This will install the Gulp command which will be available globally on your system.


Adding Gulp To A Project


Gulp is now installed, but we’ll need to add it to each project we need it for, separately. Create an empty folder now and navigate to it in your terminal. While in the folder for the project, use the following command:


npm install --save-dev gulp

This should create a node_modules folder and an npm-debug.log file in your project folder. These are used by Gulp to do its thing to your project, you don’t need to think about them at this stage.


The reason we need to add Gulp to each specific project is that each project has different requirements. One may call for SASS, another for Less. One may use Coffeescript, the other may not, and so on.


The Gulpfile


The Gulpfile is where the magic happens, it’s where you define the automations you require and when you want them to happen. Let’s create an empty default task by creating a file named gulpfile.js and pasting the following code into it.


var gulp = require("gulp"); gulp.task("default", function() // This does nothing for now, we"ll add functionality soon );

Once this file is saved you can go back to your terminal and run the gulp command on its own. Gulp detects which project it is in and runs the default task — the one we just created. You should see something like this:


Nothing really happens here, since the task is empty, but it is working fine. Now, let’s get going with some proper examples!


Copying A File


This is a boring one, I’ll admit as much, but it will help you understand what’s going on easily.


In your project folder create a file named to_copy.txt , and a folder named dev. Let’s go into our Gulpfile and create a new task named copy.


gulp.task("copy", function() return gulp.src("to_copy.txt") .pipe(gulp.dest("dev")); );

The first line defines a task that is named copy. Within this we use gulp.src to specify which files we are targeting with this task — in this case it is a single file named to_copy.txt.


We then pipe these files to the gulp.dest function which specifies where we want to put these files — I’ve used the dev directory.


Go back to your terminal and type gulp copy to run this task, it should copy the specified file to the specified directory, something like this:


The pipe command is at the heart of Gulp. It is an efficient way to move data between commands. The src command specifies the files which are piped to the dest command. In more complex scenarios we would pipe our files to other commands before specifying a destination.


You should also be aware that the source can be given as a single file, or multiple files. If we have a folder named production and we want to move all files from our development folder into it, we could use the following command:


gulp.task("copy", function() return gulp.src("development/*") .pipe(gulp.dest("production")); );

The star character will match anything within the directory. You could also match all files within all subdirectories, and do all sorts of other fancy matching. Take a look at the node-glob documentation for more info.


Compiling SASS


Compiling a stylesheet out of SASS files is a common task for developers. It can be done with Gulp pretty easily, we’ll need to do some preparation though. Apart from basic commands such as src, dest and a number of others, all functionality is added via third party addons. Here’s how I go about using them.


I type SASS Gulp into Google, the first result is usually what I need, you should find the page for the SASS package. It shows you how to install it (npm install gulp-sass). Chances are you’ll need to use sudo to install it as an administrator, so it will probably be (sudo npm install gulp-sass) .


Once done, you can use the syntax the package dictates to compile your code. To do this, create a file named styles.scss with the following content:


$primary: #ff9900; body background: $primary; 

Now create the following Gulp task in the Gulpfile.


gulp.task("sass", function () gulp.src("*.scss") .pipe(sass()) .pipe(gulp.dest("./css")); );

Before running the command, don’t forget to ‘require’ the package at the top of the Gulpfile like this:


var sass = require("gulp-sass");

When you run grunt sass, all files with the scss extension will be piped to the sass function, which will convert them to css. These are then piped to the destination function which places them in the css folder.


Watching Files And Folders


So far this is all handy, but we still need to type a command each time we want to run a task, which isn’t very efficient, especially when it comes to stylesheet changes. Gulp allows you to watch files for changes and run commands automatically.


In the Gulpfile, create a command named automate which will use the watch command to watch a set of files for changes, and run a specific command when a file changes.


gulp.task(‘automate", function() gulp.watch("*.scss", ["sass"]); );

If you type gulp automate into the terminal, it will start and finish the task, but it won’t return to the prompt because it is monitoring for changes. We’ve specified that we want to watch all scss files in the root directory and if they change, we want to run the sass command that we’ve set up previously.


If you now change your style.scss file it should be compiled to the css file within the css directory automatically.


Running Multiple Tasks


There are many situations where you might want to run multiple tasks. When watching your javascript folder you may want to compile concatenate two files and then proceed to minify them. There are two ways you can get this done.


If tasks are related, I like to chain them. A good example would be the concatenation and minification of javascript files. We first pipe our files to the concat action, then pipe them to gulp-uglify, then use the destination function to output them.


If tasks are unrelated you could call multiple tasks. An example would be a task where we want to concatenate and minify our scripts and also compile our SASS. Here’s he full Gulpfile of how that would look.


var gulp = require("gulp"); var uglify = require("gulp-uglify"); var concat = require("gulp-concat"); var sass = require("gulp-sass"); gulp.task("scripts", function() gulp.src("js/**/*.js") .pipe(concat("scripts.js")) .pipe(gulp.dest(".")) .pipe(uglify()) .pipe(gulp.dest(".")) ); gulp.task("styles", function() gulp.src("/*.scss") .pipe(sass()) .pipe(gulp.dest("./css")); ); gulp.task("automate", function() gulp.watch(["*.scss", "js/**/*.js"], ["scripts", "styles"]); ); gulp.task("default", ["scripts", "styles"]);

If you type gulp scripts into the terminal, all javascript files within the js directory will be concatenated, output to the main directory, then uglified and saved to the main directory.


If you type gulp sass, all your scss files will be compiled and saved to the css directory.


If you type gulp (the default task), your scripts task will be run, followed by your styles task.


The gulp automate task watches multiple folders for changes in our scss and js files and will perform both tasks we’ve defined, if a change is detected.


Overview


Using Gulp is not difficult, in fact, many people prefer it over Grunt because of its simpler syntax. Remember the steps to take when creating a new automation:


  • Search for plugin

  • Install plugin

  • Require plugin in your Gulpfile

  • Use the syntax in the documentation

The five commands available in Gulp (task, run, watch, src, dest) are the only ones you need to know, all third party addons have great documentation. Here’s a list of some things I use which you could get started with right now:


Getting Started With Gulp.js

Getting Started with Micro UX: a Simple Guide & 5 Fascinating Examples

Designer Charles Eames once said “The details are not the details. They make the design.” In line with this idea, many designers have started to change the way they think about user experience. Instead of looking at the big picture and mapping out the entire user journey, a new approach called Micro UX flips the experience design process on its head. In this article, you’ll learn what Micro UX is, how it can improve your designs, and five ways to incorporate it brilliantly.


What is Micro UX?


Many designers tackle UX with a sort of big-to-small approach. That is, they think of a fundamental concept for a design or site, analyze what the end user will want to do, and consider how they can facilitate these tasks. Micro UX actually reverses that process, looking at projects with a small-to-big approach. It involves thinking about the smallest details of the design first, and assembling those to create the bigger picture.


When designing with Micro UX in mind, think about how a user will interact with specific functions on the site rather than the general motivation to use it. Start out with individual aesthetic or functional elements that you know you want to incorporate into the site, and assemble those smaller elements in order to create the bigger, more complete design. Designers and developers focusing on Micro UX may go into a design without the complete picture in mind and let the small details determine the outcome of the overall product.


Micro Vs. Macro UX


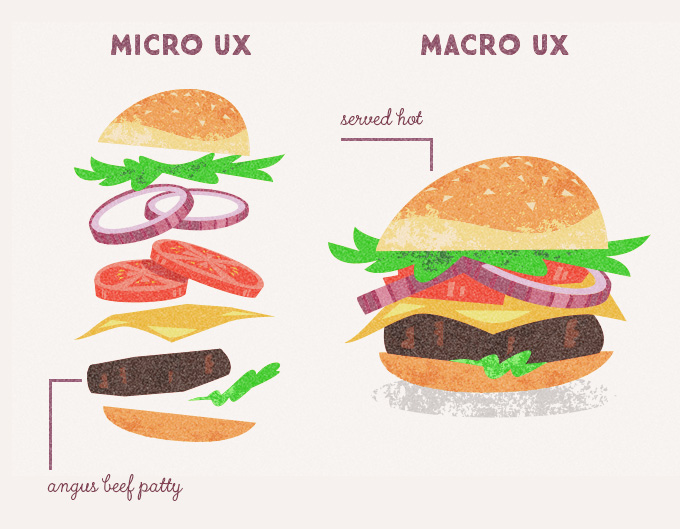
To understand how Micro UX relates to Macro UX, consider cooking burgers. Facing the challenge with a Macro UX approach, you would concentrate on planning out the experience of a full, flavorful bite. You would probably worry about things like finding toothpicks to hold the whole thing together, and making sure that burgers are served hot off the grill.


Focusing on Micro UX, on the other hand, would make you think in terms of individual ingredients. You’d work hard on finding the best available beef (perhaps angus?), whipping up a distinctive sauce, or even baking the buns yourself. Your beef patty may be so special that people end up eating it without a bun! In Micro UX we focus on making each small component delightful, attractive and innovative so that the user’s experience as a whole may exceed his or her expectations.


As you’ve probably realized, the general plan for this experience is just as important as the detailed surprises found in each component. That’s why integrating Macro and Micro UX is one of our greatest opportunities as designers. It is also a challenge that certainly brings rewards in terms of user satisfaction.


Micro UX vs. Macro UX example


When Is Micro UX More Useful?


Sometimes it might make more sense to focus on Micro UX. Going back to the burger example, what if you weren’t sure what the final product should look like? As far as you’re concerned, this could easily become a sandwich along the way. In that case, focusing on the quality of the ingredients might be a better approach. Think about it: if you shift all your efforts to perfecting the individual parts (i.e. making an amazing bun or special sauce), wouldn’t the final product, whatever that is, end up tasting better?


This approach is particularly useful with new, innovative projects – ones whose audience is not predetermined and the level of use and success is unknown. It’s also a great choice for a new website or product that is aimed at competing with or supplanting an existing one. In this case, the site can take the basic form of that of a competitor and improve on its details. Finally, it’s a great choice for any site that needs to be updated but not overhauled. Approaching a site with a Micro UX approach can allow small, noticeable improvements to be made without overhauling a system that has already been proven to work.


Micro UX in Action


Micro UX Example in the Mugatu WordPress Theme


This map marker’s animation calls the user’s attention to the company’s location. Despite being subtle, it does manage to stand out in the one-page flow of the Mugatu Business Theme for WordPress.


Micro UX Example in the Conference WordPress Theme


There are many ways to present a speaker schedule, but the way this table was crafted certainly makes it easier for the viewer to navigate time slots, talk descriptions and event dates. From the Conference WordPress Theme.


Micro UX Example in the Scorilo WordPress Theme


This accordion layout makes the job of looking for an answer much easier. Frequently asked questions are grouped by topic, and the user can quickly read each answer by clicking on the plus sign. Found in Scorilo for WordPress.


Micro UX Example in the Hagu WordPress Theme


A well-thought-out typographic treatment can dramatically improve a user’s experience with our site’s content. In this case, the Hagu theme features drop caps and other exquisite details.


Micro UX Example in the PTS Goodnight Prestashop Theme


This rich mega-menu features quick product descriptions, vivid imagery and a clear emphasis on price reductions. Online shoppers will find this seemingly small detail very useful when trying to find a few products to focus on. Found on the PTS Goodnight Prestashop theme.


Use Micro UX Wisely


There is certainly a growing focus in the industry on Micro UX, and designers will have to incorporate it in order to set themselves and their products apart. However, an ideal solution is that where Macro and Micro UX work together to ensure that a user gets what he or she wants out of the product, but is also blown away by its tiny, easy-to-use and aesthetically pleasing details.


PS – Did you think the animated GIFs above made a difference? That’s Micro UX in action!


Images created using Burger Vector Illustration, iPhone 5 + Sketchbook – Mockup # 1 and the True North Font Pack.


Getting Started with Micro UX: a Simple Guide & 5 Fascinating Examples