Showing posts with label Easy. Show all posts

Sunday, May 3, 2015

Some Easy Methods for Marketing Your Design Business


Up until now, your new design business has been like a well-kept secret. Your friends and family know that you’ve put your talents on the market, but not many other people do (like clients). Here is how to pique the public’s interest in a way that doesn’t lump you in a noisy self-promoting mess.


Marketing design over orange background
Image Source: Marketing Design via Shutterstock.


Promoting Your Name Online


Online marketing is a never-ending revolving door, with something new flying out at every turn. To stay relevant as a designer, especially an independent one, you can’t afford to let yourself get buried under all the other content coming at your audience from across the Internet. When you understand your business goals and your target demographic, you can start making yourself a fixture in your future clients’ lives. Some ways to achieve this include:


  • Blogging regularly, at least once a week, with a unique take on relevant topics. Occasional fun posts are okay too — describing the awesome trip you just took with your family or sharing your thoughts on the latest big-screen adaptation of your favorite book.

  • Linking to other design industry blogs, especially well-read ones, in your own posts. Connections with reputable sites not only builds relationships with those sites, but it also improves your online visibility.

  • Being an active member of online forums and the member communities of design websites, strengthening your community connection with your presence and authoritative insights.

  • Sharing your latest projects on visual-friendly social sites like Pinterest, Instagram, and Facebook. (Facebook and Twitter are also good for promoting your blog updates.)

  • Once you’ve established yourself as a voice in your field, asking other established sites if you can contribute to their website (articles, infographics, etc.). (Note that it helps if your content has received a lot of engagement, showing them they’ll receive similar results with an original contribution.)

In every promotional outreach, your brand image is key. If you look the same everywhere, thanks to your consistent profile pictures, business name, and writing style, the design community will begin to recognize you — which establishes your name among a well-sought after audience.


Engaging Potential Customers Offline


Never underestimate the power of good old print marketing to keep your top-of-mind awareness in your local community. Consumers feel a stronger connection to something they can hold in their hand than to anything that flashes by on a screen, evidenced by the fact thatdirect mail leads them to spend more. Print pieces such as locally posted flyers and oversized postcards put your work, your name, your logo, and hopefully your face in front of potential clients as they go about their daily activities.


These items should showcase not only your own skill, but what others say about you, so throw in some good reviews you’ve received. If you don’t have many reviews to pick from yet, ask for recommendations from those who have praised your work in the past. Don’t be afraid to name-drop some of your well-known clients (with their permission, of course). After enough exposures, those who view your materials might just look you up online.


Offline marketing doesn’t have to be restricted to pieces of paper in various shapes, either. Here’s a list of ideas you can use to get people noticing your business as you go about your everyday life:


  • Let clients know you’re thinking of them by sending them holiday cards that you design specifically for them. The personalization will stick out, allowing your service to become top-of-mind.

  • Have a superb business card to hand out while networking. Good design on such a small medium is one of the most powerful ways you can demonstrate your skill to future clients.

  • Hold a contest of your choice among local businesses, with the winner getting a free design service from you. This alerts potential clients to your existence and talents.

  • Stick a branded car decal or magnet on your vehicle, for promotion that is both affordable and garners a high view rate.

  • Consider running an ad or two in local print media, to reach a demographic that may not get online much, but enjoys unwinding with a magazine or newspaper. Anything you can do to expand your audience (without exceeding your ad budget) will help your visibility.

Most importantly, let people get to know you. Talk to them at business gatherings, at town events, in line at the coffee shop at lunch, wherever! If the conversation leads to what you do for a living, that’s a great opportunity; but if it doesn’t, don’t force it. Just establishing a pleasant connection between your face and your personal interactions may lead business later on.


Optimizing Both Strategies for Maximum Visibility


As always, your on- and offline efforts should work together. Being present and interacting in both fields is necessary for success. Design your promotional strategy around your intended clients. Prove that their business is worth your time and they’ll start to see you as being worth their time.


The optimum balance of print and digital marketing is different for every independent designer. Factors like the location, preferred media, and the level of market saturation will all have an impact on your marketing strategy. It may take you a few trial-and-error attempts to achieve the best return for your promotions, but even your small baby steps will help to make you more noticeable than you were before.


Finished


What have you learned in your journey to integrate your marketing efforts? Share your stories below!


The post Some Easy Methods for Marketing Your Design Business appeared first on Speckyboy Web Design Magazine.


Some Easy Methods for Marketing Your Design Business

Thursday, April 16, 2015

Easy Shortcuts for a Faster Illustration Workflow

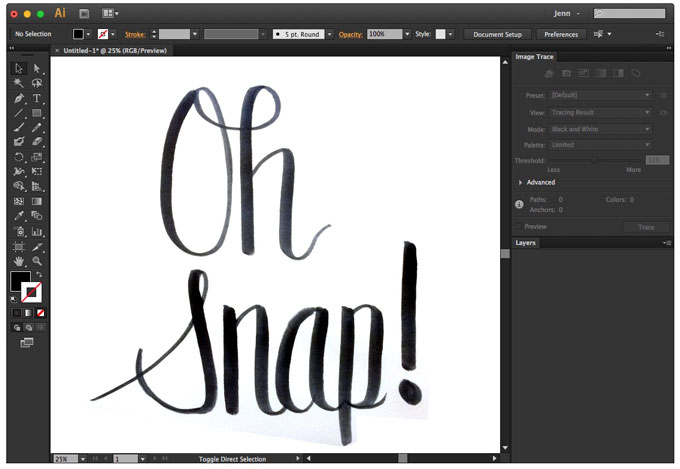
When you’re consistently taking your artwork from paper to digital, it’s important to establish a workflow that will end up saving you a lot of time. In this tutorial, I’m going to focus on scanning your completed black and white artwork and vectorizing it.


I’m sure you’ve read tutorials on how to vectorize your work. Heck, I’ve written a few myself. But having a process outlined by shortcut will save you time and make a great reference. (I can’t be the only one who references my own blog posts when working on things.)


Think About Your Drawing Size


This may seem obvious, but it’s something that I’ve learned the hard way. When you’re drawing something that is ultimately going to be scanned, it helps if the piece of paper you’re drawing on will fit in your scanner. I know. What I just said is ridiculous, but it’s true. Don’t end up with something that will require multiple scans and then stitching it together in Photoshop. Major time waster.


Scanning Your Work


Scan your work and use your presets. 300dpi at greyscale is perfect. If you’ve thought ahead and drew your work at 8.5″ x 11″, you’re set to use the Letter preset.


Or, if you’ve got a smart phone, snap a photo of your work in good lighting and email it to yourself like I did here.


take-a-photo-or-scan


Shortcuts in Photoshop


Now you’re ready to work some keyboard magic.


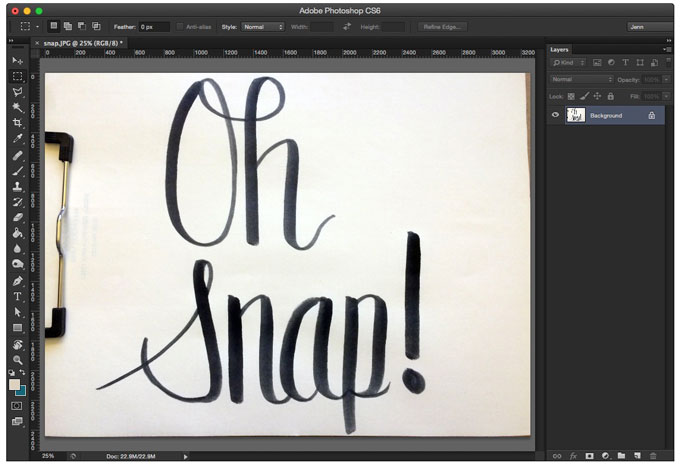
Open your work: CMD+O


Navigate to where you scanned your drawing and open it in Photoshop.


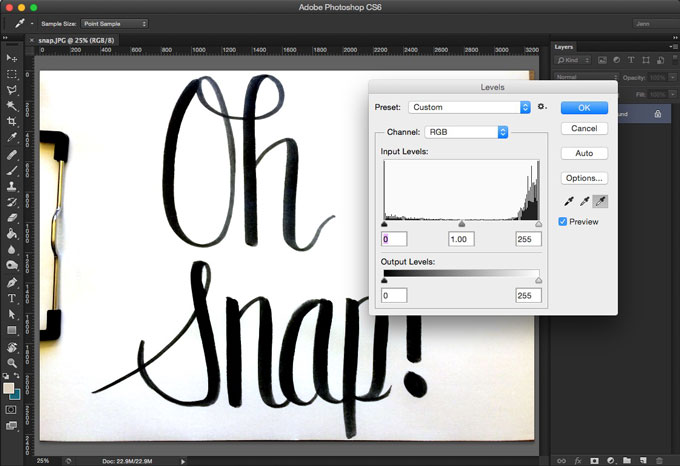
Adjust Your Levels: CMD+L


Use the Levels dialog box to whiten your whites and darken your blacks. You want a super high-contrast drawing. Use the sliders, or use the eyedroppers. Choose the white eyedropper and click on your drawing where you want your whitest-white to be. Then choose the black eyedropper and click where you want your blackest-black to be.


adjust-levels-in-photoshop


In a Rush? Use CMD+SHIFT+L


Auto levels. Boom. Though it usually pays to take the time and hand-tweak your levels like above.


auto-adjusted-levels


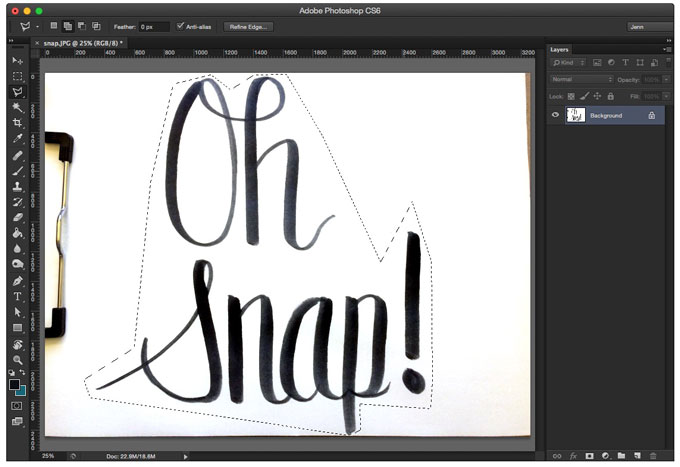
Select Your Work with Lasso: L


Use the Polygonal Lasso tool to draw a loose marquee around your drawing. This will allow you to only choose the parts of the drawing that you want to bring into Illustrator. And if you took a photo instead of scanning, you can use the lasso tool to avoid some vignetting that may have occurred.


select-work-using-lasso-tool


Want Square? Go Marquee: M


If you don’t need a fancy polygonal lasso to select your art, use M for Marquee and draw a plain old box.


Copy Your Work: CMD+C


You’re copying your selection to paste it into Illustrator next.


Shortcuts in Illustrator


Open Illustrator and start a new document (CMD+N) and don’t worry too much about the document size here. Just hit Enter.


Paste Your Drawing: CMD+V


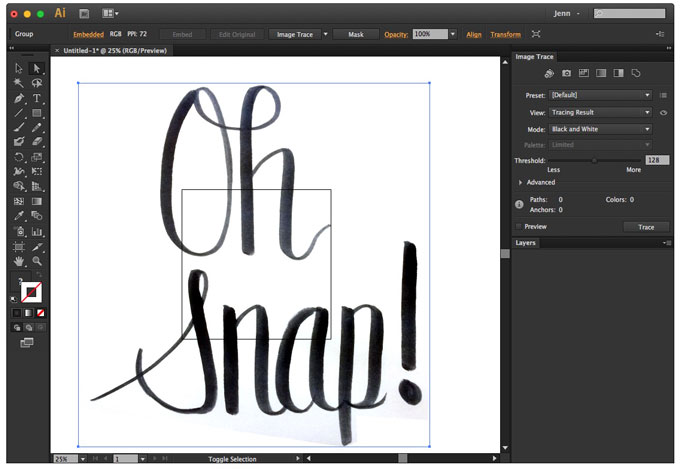
Paste your drawing onto your artboard in Illustrator.


paste-your-drawing-into-illustrator


Hide Your Artboard: CMD+SHIFT+H


No need to see the pesky artboard. Work with a distraction-free surface by hiding your artboard.


no-artboard-needed


Select Your Art: V


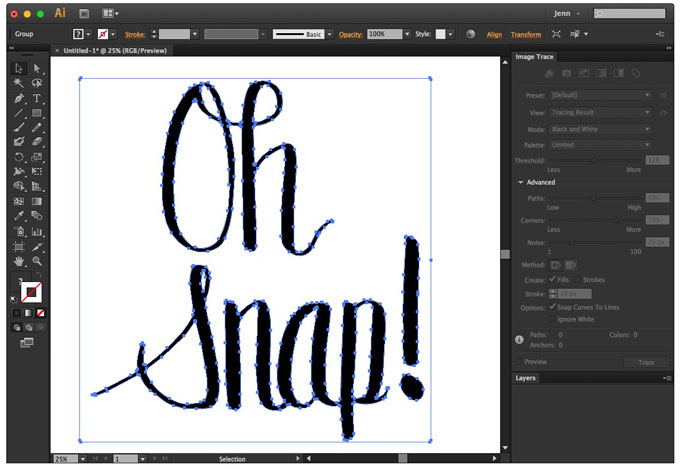
Use the Selection Tool to select your pasted drawing. Then head on over to the Image Trace panel and choose Black and White Logo. Play with the Threshold, Paths, Corners, and Noise sliders as needed, until your art looks awesome.


Expand your drawing so you have outlined paths of your art.


expanded-artwork


Ungroup Twice: CMD+SHIFT+G


Select your artwork again (V) and ungroup it with CMD+SHIFT+G, twice. Now delete the extra pieces of your drawing that you don’t need, like the background.


Group Similar Objects: CMD+G


Some pieces of your drawing will need to be grouped. Select them with the Selection Tool (V) and hold down SHIFT to select multiples. Group the selected objects by using CMD+G.


group-similar-objects


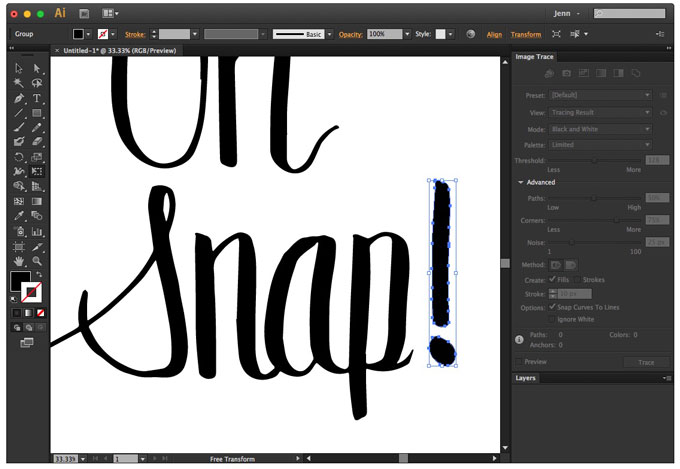
Free Transform: E


Are some items sized poorly? Need to rotate something? Hit E for Free Transform. Hold down Shift to adjust with the same proportions. Hit V when you’re done.


free-transform-to-fix-sizes


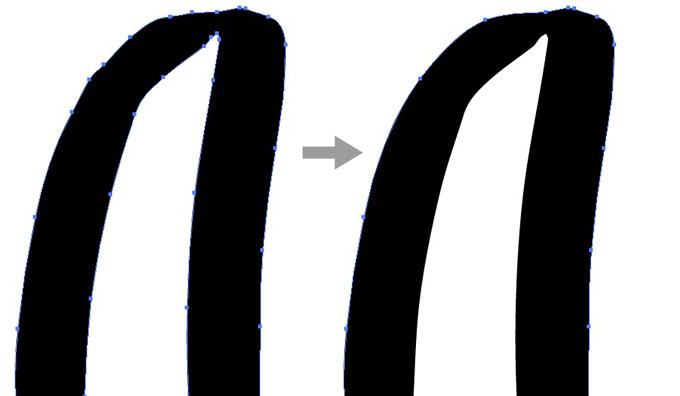
Smooth Things Out: SHIFT+S


The Smooth Tool is underutilized, mostly because there’s no default keyboard shortcut assigned to it by Illustrator. When paired with Image Trace, the Smooth Tool really shines.


Use the smooth tool by selecting your drawing piece (V) and then smoothing it out (SHIFT+S) by clicking and dragging over the bumpy edge using your mouse.


smooth-tool


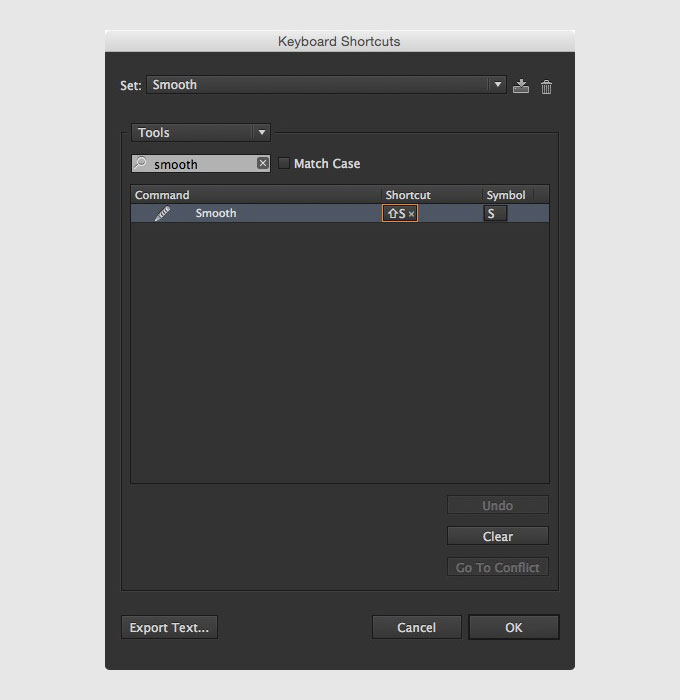
SHIFT+S not working for you? You need to set it up! The Bonus Tip: Create your own Smooth Tool shortcut by going to Edit → Keyboard Shortcuts… (Guess what, the keyboard shortcut for Keyboard Shortcuts is CMD+OPT+SHIFT+K). Find the Smooth Tool by searching for it, then assign it something easy you’ll remember. I chose SHIFT+S because I wasn’t using SHIFT+S for anything else. Overwrite the current shortcut if necessary.


set-your-own-keyboard-shortcuts


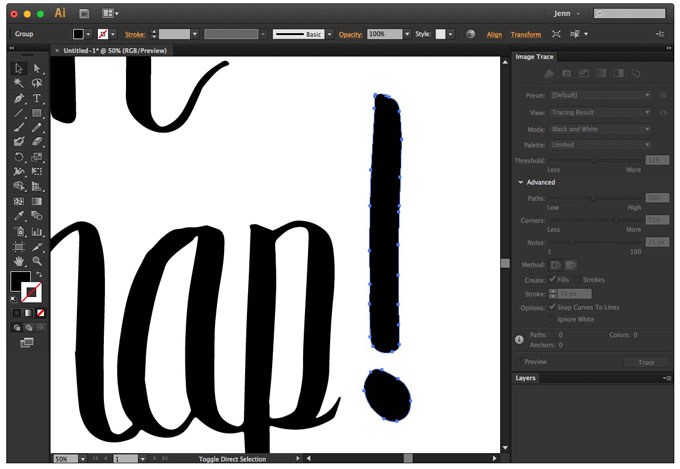
Pesky Anchor Point Stuff Going On? Use the Direct Selection Tool: A


Select specific anchor points with the Direct Selection Tool. Click and move them around as you see fit.


A Group of Pesky Anchor Point Stuff? Use the Lasso Tool: Q


Draw a closed shape around the group of anchor points you wish to massage with the Lasso Tool to select them. Then switch to Direct Selection Tool (A) to move the group around.


use-q-lasso-tool-to-select-multiple-anchor-points


Wrangle with the Pen Tool: P


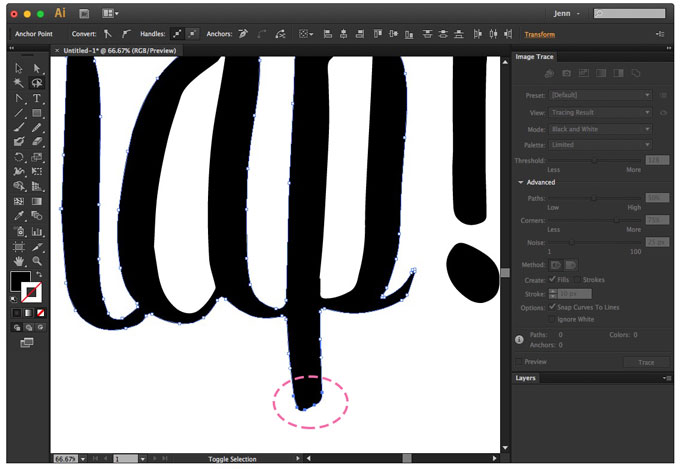
Sometimes there is just one too many anchor points. Add and subtract anchor points with the Pen Tool (P). Finesse your lines by massaging anchor points and bezier handles.


pen-tool-can-remove-extra-points


Finally, Save Your Work: CMD+S


Save your work and have fun with your newly vectorized drawing.


snap-final


Now, take time to reflect on how quickly you can maneuver around Photoshop and Illustrator, now that you have a solid stockpile of awesome keyboard shortcuts to save you time in your paper-to-digital workflow.


Jennifer Coyle is a Philadelphia-based UI Designer and illustrator who loves to create fonts and resources on Creative Market. She also shares tutorials and inspiration for designers and creative entrepreneurs on her blog at Hello Brio Studio. Take her Skillshare class to learn how to make your own hand drawn font.


Products Seen In This Post:


getpaidtowrite-banner
Easy Shortcuts for a Faster Illustration Workflow

Thursday, April 2, 2015

HipChat: Communication for Teams, Made Easy!


If you are managing a web design or development project, you must already be aware of the fact that collaboration is the key to the success of the project. If your team fails to interact and collaborate well, the project will fail as well.


This is especially important if you manage a distributed team across different countries and time zones. In such cases, the role of a proper communication channel becomes paramount.


Allow me to introduce you to HipChat, a new tool that offers instant messaging, group and private chats, file sharing and a lot more to help your team members interact and collaborate effectively.


HipChat_Email_Blast-02


What is HipChat?


HipChat is a simple tool for team chat and instant messaging purposes. It helps your team members collaborate and discuss the key points of the given project at hand. As such, HipChat can help you get out of that cluttered email inbox, and be more productive.


Apart from IM and chat functionality, HipChat also offers file sharing capabilities, and a lot more.


Features


Here is what HipChat brings to the table:


  • HipChat provides IM, group chats and private chats.

  • Just in case you are wondering, it also offers video and voice calls.

  • Users can share files and videos, etc.

  • HipChat is free, irrespective of the number of users your team might have.

  • It offers native apps for virtually every operating system that you can think of: iOS, Android, Mac, Windows, Linux… you name it!

  • HipChat uses 256-bit SSL encryption and is fully secure.

  • You can even deploy HipChat on your own server!

  • Beyond that, HipChat can also integrate with third party services, such as Asana, Google Hangouts, and Heroku. See the full list here.

Pricing


All sounds cool? Wondering how costly it might be?


Well, HipChat offers a very simple pricing structure. The Free plan is totally free for life, and the Paid plan is per user/month. The difference between the two is straightforward: the paid plan offers video and voice calls, as well as screen sharing.


Furthermore, the free plan storage space is capped at 5 GB, whereas the paid plan offers unlimited storage.


Appraisal


HipChat seems to be an indispensable tool, for both distributed and non-distributed teams.


Collaboration via email has, time and again, proven to be ridiculously cluttered — and people fall for the “reply to all” button even today! Plus, most team collaboration tools tend to offer IM or discussions as a side note — their primary focus is on task management and/or content management, and you are at best left with a small chat applet or a discussion thread to help you sort your interaction issues.


Mac-UI-VideoChat


Thus, HipChat is trying to fill a void that does exist, and by and large, can prove to be a really beneficial product for both big and small teams. With its free plan, you get a taste of the basic features, but even the paid plan is too easy on the pocket, and you should surely give it a try! Most certainly, HipChat will help boost the overall productivity of your team by fostering easier communication and collaboration.


This post has been sponsored by Syndicate Ads.


The post HipChat: Communication for Teams, Made Easy! appeared first on Speckyboy Web Design Magazine.


HipChat: Communication for Teams, Made Easy!

Tuesday, March 10, 2015

PrestaShop Makes Setting Up an Online Store Easy

With the ever growing popularity of online stores, a lot of people have come to wonder which platforms are suitable to help them sell online. Today we will be looking at one of the most trusted online platforms for setting up your selling business, PrestaShop. PrestaShop is free ecommerce software built on a solid foundation of support structures and helping you the seller prosper.


So why exactly should you consider PrestaShop as your online platform for setting up your business? Let’s have a look at the few points below.


presta-shop-demo


Selling should be easy


When looking at any store provider for your new project, you have to make sure that their platform is suited to your selling needs. No one ever said selling would be easy, but with the right provider, I beg to differ. PrestaShop sets its self apart by having taken care of every detail so that you don’t have to worry about a thing.


From setup, to sale you’re covered from head to toe with guides, directions and ease of use functions. Setting up a store has never been this easy. PrestaShop has two great ways to get started selling online. The first way is by downloading PrestaShop and hosting it on your own server. Or you can go with the new cloud version of PrestaShop, which is hosted on PrestaShops cloud servers, but still completely free. Both options still run off the same version of PrestaShop, it just comes down to if you want to host it yourself, or have free hosting with the cloud.


Walk through their demo


YOU are their most important asset


When it comes to a lot of companies, they worry about their revenue, their platform, their mistakes, their press etc. When it comes to PrestaShop, what I’ve found is that they value their users, and the community the most. Yes, sure they look after their business, just like everyone else, but with a community of over 700,000 you can see why the company has been built around this group. PrestaShop also has the largest and most active ecommerce forum in the world. It’s where you can go to ask questions, find answers and make the most of your online store.


signup-prestashop


Easy to setup solutions


I’ve tried a lot of software over the years and it amazes me how simple their available solutions are. If I didn’t want to setup my own server and self-host, I’d simply click on their cloud setup, choose my store name and email address and Bam! I’m in. Obviously there will be a bit of a process to go through, I mean you’re setting up a shop to take other people’s money from them…However, PrestaShop has really streamlined the process to help you get up and running a lot faster than most other platforms online will.


If you were to go with the self-hosted solution they offer, most of it will be in your hands. Setting up your server, installing the platform, setup, database connection etc. It comes down to who you want to serve and what your technical abilities look like. Either way, PrestaShop has the best solutions for your store.


Scalability in mind


PrestaShop thought ahead when they started launching online stores. That’s why they have more than 200,000 stores online that have been launched using PrestaShop. One of the key things to look at when building a sales portal for your goods is the scalability of the platform. In this case, PrestaShop is one of the best platforms when it comes to scalability. PrestaShop has no limits on the number of products you can sell, and is capable of handling as many pages as your store might need. They also have a plethora of certified web agencies to help you with anything from design to development surrounding the platform, they will help you make your dream become a reality whilst earning you money.


presta-shop-training


Hands-On Training


In the day and age we live in, knowledge is everything. Therefore PrestaShop has built an educational training division into the company. Teaching you to become better at using their platform to sell; they has expert instructors on hand to teach you the ins and outs of the platform and how you can take full advantage and be successful using the PrestaShop solution. These sessions are conduct online on a monthly basis, but classes are kept small to make it easier to interact live with the instructor to answer any questions you might have.


Expert Support to help you


Support is the most important part of any company. Especially when the you, the customer struggle to get into the backend of your store, have missing products or any other problem for that matter. The support system PrestaShop has put in place helps you focus on what matters in your business so that they can take care of the rest. You can sleep soundly at night knowing their are people out there that are ready to help you at a moments notice. One of the most overlooked places for support comes right from the forum. Many of the issues you may encounter when creating and running your online store have most likely happen to someone else earlier on.


Checking the forum for the answer to your question is sometime the fastest way to find the answer you’re looking for and keep your store up and running with out any downtime.


Conclusion


You don’t have any excuse not to launch that sock shop you’ve been wanting this entire time or that clothing line. PrestaShop is there to help you setup in no time and run a profitable online store! Are you running an online store with PrestaShop currently? Using another platform and looking to switch? Let us know in the comments below!


PrestaShop Makes Setting Up an Online Store Easy

Thursday, January 8, 2015

A Simple And Easy Guide To Understand Sass

A while ago Thoriq Firdaus wrote a great article about getting started with Sass which showed you how to install and use this highly useful CSS preprocessor language (you might want to check it out, you know, to get started).


In this article I thought I’d give you a bit more insight into what you can do with Sass and how developers use it every day to create better and more modular CSS code. Skip ahead to the section you want:


Tools Of The Trade


Thoriq showed you how you can use Sass from the command line using the sass --watch command.


If you prefer GUI tools, you can go with my personal favourite app, Codekit, a web developer tool for compiling Sass, concatenating, autoprefixing and much more. Prepros is another very capable application which can be used on all systems. Both are paid applications but are well worth it if you’ll be using them in the long run.


If you just want to try out Sass without paying for anything you can use the terminal, or Koala (here’s our review), a free cross-platform feature-rich app, which can hold its ground against premium counterparts.


Variables


One of the first things you’ll need to wrap your head around is variables. If you come from a PHP or other similar coding language background this will be second nature to you. Variables are for storing bits and pieces of reusable information, like a color value for example:


$primary_color: #666666;

.button
color: $primary_color;


.important
color: $primary_color;


This may not seem that useful here, but imagine having 3,000 lines of code. If your color scheme changes you would need to replace each color value in CSS. With Sass you can just modify the value of the $primary_color variable and be done with it.


Variables are used for storing font names, sizes, colors and a host of other information. For larger projects it may we worth extracting all your variables into a separate file (we’ll take a look at how this is done soon). What this allows you to do is recolor your whole project and change fonts and other key aspects without ever touching actual CSS rules. All you need to do is modify some variables.


Nesting


Another basic feature Sass gives you is the ability to nest rules. Let’s assume that you’re building a navigation menu. You have a nav element which contains an unordered list, list items and links. In CSS you may do something like this:


#header nav
/* Rules for the nav area */


#header nav ul
/* Rules for the menu */


#header nav li
/* Rules for list items */


#header nav a
/* Rules for links */


In the selectors, we are repeating ourselves a lot. If elements have common roots, we can use nesting to write our rules in a much cleaner way.


Here’s how the above code could look in Sass:


#header
nav
/* Rules for the nav area */


ul
/* Rules for the menu */


li
/* Rules for list items */


a
/* Rules for links */


Nesting is extremely useful because it makes stylesheets (a lot) more readable. By using nesting together with proper indentation you can achieve highly legible code structures, even if you have a fair amount of code.


One drawback of nesting is that it can lead to unnecessary specificity. In the example above I’ve refered to links with #header nav a. You could also use #header nav ul li a which would probably be too much.


In Sass, it is much easier to be very specific since all you need to do is nest your rules. The following is far less readable and quite specific.


#header
nav
/* Rules for the nav area */
ul
/* Rules for the menu */
li
/* Rules for list items */
a
/* Rules for links */


Extending Rulesets


Extending will be familiar if you’ve working with object oriented languages. It is best understood through an example, let’s create 3 buttons which are slight variations of each other.


.button
display: inline-block;
color: #000;
background: #333;
border-radius:4px;
padding:8px 11px;


.button-primary
@extend .button;
background: #0091C2


.button-small
@extend .button;
font-size:0.9em;
padding:3px 8px;


The .button-primary and .button-small classes all extend the .button class which means that they take on all its properties and then define their own.


This is immensely useful in many situations where variations of an element can be used. Messages (alert / success / error), buttons (colors, sizes), menu types and so on could all use the extending functionality for great CSS efficiency.


One caveat of extends is that they won’t work in media queries as you would expect. This is a bit more advanced but you can read all about this behavior in Understanding Placeholder Selectors – placeholder selectors are special kind of extend which we’ll talk about soon.


Mixins


Mixins are another favorite feature of preprocessor users. Mixins are reusable rulesets – perfect for vendor-specific rules or for shorthanding long CSS rules.


How about creating a transition rule for hover elements:


@mixing hover-effect
-webkit-transition: background-color 200ms;
-moz-transition: background-color 200ms;
-o-transition: background-color 200ms;
transition: background-color 200ms;


a
@include hover-effect;


.button
@include hover-effect;


Mixins also allow you to use variables to define the values within the mixin. We could rewrite the example above to give us control over the exact time of the transition. We may want buttons to transition a tiny bit slower for example.


@mixin hover-effect( $speed )
-webkit-transition: background-color $speed;
-moz-transition: background-color $speed;
-o-transition: background-color $speed;
transition: background-color $speed;


a
@include hover-effect(200ms);


.button
@include hover-effect(300ms);


Placeholder Selectors


Placeholder selectors were introduced with Sass 3.2 and solved a problem which could cause a bit of bloat in your generated CSS code. Take a look at this code which creates error messages:


.message
font-size:1.1em;
padding:11px;
border-width:1px;
border-style:solid;


.message-danger
@extend .button;
background: #C20030;
color:#fff;
border-color: #A8002A;


.message-success
@extend .button;
background: #7EA800;
color:#fff;
border-color: #6B8F00;


It is most likely that the message class will never be used in our HTML: it has been created to be extended, not used as is. This causes a little bit of bloat in your generated CSS. To make your code more efficient you can use the placeholder selector which is indicated with a percentage sign:


%message
font-size:1.1em;
padding:11px;
border-width:1px;
border-style:solid;


.message-danger
@extend %button;
background: #C20030;
color:#fff;
border-color: #A8002A;


.message-success
@extend %button;
background: #7EA800;
color:#fff;
border-color: #6D9700;


At this stage you may be wondering what the difference between extends and mixins are. If you use placeholders they behave like a parameter-less mixin. This is true, but the output in CSS differs. The difference is that mixins duplicate rules while placeholders will make sure that the same rules share selectors, resulting in less CSS in the end.


Operations


It’s hard to resist the pun here, but I’ll refrain from any medical jokes for now. Operators allow you to do some math in your CSS code and can be pretty darn helpful. The example in the Sass guide is perfect for showcasing this:


.container width: 100%;

article
float: left;
width: 600px / 960px * 100%;


aside
float: right;
width: 300px / 960px * 100%;


The example above creates a 960px based grid system with minimum hassle. It will compile down nicely to the following CSS:


.container
width: 100%;


article
float: left;
width: 62.5%;


aside
float: right;
width: 31.25%;


One great use I find for operations is to actually mix colors. If you take a look at the success message Sass above it’s not clear that the color of the background and the border have some sort of relationship. By subtracting a shade of gray we can darken the color, making the relationship visible:


$primary: #7EA800;

.message-success
@extend %button;
background: $primary;
color:#fff;
border-color: $primary - #111;


The lighter the subtracted color, the darker the resulting shade will be. The lighter the added color, the lighter the resulting shade.


Functions


There are a great number of functions to use: Number functions, string functions, list functions, color functions and more. Take a look at the long list in the developer documentation. I’ll take a look at a couple here just to show you how they work.


The lighten and darken function can be used to change the lightness of a color. This is better than subtracting shades, it makes everything even more modular and obvious. Take a look at our previous example using the darkening function.


$primary: #7EA800;

.message-success
@extend %button;
background: $primary;
color:#fff;
border-color: darken( $primary, 5 );


The second argument of the function is the percentage of darkening required. All functions have parameters; take a look at the documentation to see what they are! Here are a few other self-explanatory color functions: desaturate, saturate, invert, grayscale.


The ceil function, just like in PHP, returns a number rounded to the next whole number. This can be used when calculating column widths or if you don’t want to use a lot of decimal places in the final CSS.


.title
font-size: ceil( $heading_size * 1.3314 );


Overview


The features in Sass give us great power to write better CSS with less effort. The proper use of mixins, extends, functions and variables will make our stylesheets more maintainable, more legible and easier to write.


If you’re interested in another similar CSS preprocessor I suggest taking a look at LESS (or check out our beginner’s guide) – the underlying principal is much the same!


A Simple And Easy Guide To Understand Sass

A Simple And Easy Guide To Understand Sass

A while ago Thoriq Firdaus wrote a great article about getting started with Sass which showed you how to install and use this highly useful CSS preprocessor language (you might want to check it out, you know, to get started).


In this article I thought I’d give you a bit more insight into what you can do with Sass and how developers use it every day to create better and more modular CSS code. Skip ahead to the section you want:


Tools Of The Trade


Thoriq showed you how you can use Sass from the command line using the sass --watch command.


If you prefer GUI tools, you can go with my personal favourite app, Codekit, a web developer tool for compiling Sass, concatenating, autoprefixing and much more. Prepros is another very capable application which can be used on all systems. Both are paid applications but are well worth it if you’ll be using them in the long run.


If you just want to try out Sass without paying for anything you can use the terminal, or Koala (here’s our review), a free cross-platform feature-rich app, which can hold its ground against premium counterparts.


Variables


One of the first things you’ll need to wrap your head around is variables. If you come from a PHP or other similar coding language background this will be second nature to you. Variables are for storing bits and pieces of reusable information, like a color value for example:


 $primary_color: #666666; .button color: $primary_color; .important color: $primary_color; 

This may not seem that useful here, but imagine having 3,000 lines of code. If your color scheme changes you would need to replace each color value in CSS. With Sass you can just modify the value of the $primary_color variable and be done with it.


Variables are used for storing font names, sizes, colors and a host of other information. For larger projects it may we worth extracting all your variables into a separate file (we’ll take a look at how this is done soon). What this allows you to do is recolor your whole project and change fonts and other key aspects without ever touching actual CSS rules. All you need to do is modify some variables.


Nesting


Another basic feature Sass gives you is the ability to nest rules. Let’s assume that you’re building a navigation menu. You have a nav element which contains an unordered list, list items and links. In CSS you may do something like this:


 #header nav /* Rules for the nav area */ #header nav ul /* Rules for the menu */ #header nav li /* Rules for list items */ #header nav a /* Rules for links */ 

In the selectors, we are repeating ourselves a lot. If elements have common roots, we can use nesting to write our rules in a much cleaner way.


Here’s how the above code could look in Sass:


 #header nav /* Rules for the nav area */ ul /* Rules for the menu */ li /* Rules for list items */ a /* Rules for links */ 

Nesting is extremely useful because it makes stylesheets (a lot) more readable. By using nesting together with proper indentation you can achieve highly legible code structures, even if you have a fair amount of code.


One drawback of nesting is that it can lead to unnecessary specificity. In the example above I’ve refered to links with #header nav a. You could also use #header nav ul li a which would probably be too much.


In Sass, it is much easier to be very specific since all you need to do is nest your rules. The following is far less readable and quite specific.


 #header nav /* Rules for the nav area */ ul /* Rules for the menu */ li /* Rules for list items */ a /* Rules for links */ 

Extending Rulesets


Extending will be familiar if you’ve working with object oriented languages. It is best understood through an example, let’s create 3 buttons which are slight variations of each other.


 .button display: inline-block; color: #000; background: #333; border-radius:4px; padding:8px 11px; .button-primary @extend .button; background: #0091C2 .button-small @extend .button; font-size:0.9em; padding:3px 8px; 

The .button-primary and .button-small classes all extend the .button class which means that they take on all its properties and then define their own.


This is immensely useful in many situations where variations of an element can be used. Messages (alert / success / error), buttons (colors, sizes), menu types and so on could all use the extending functionality for great CSS efficiency.


One caveat of extends is that they won’t work in media queries as you would expect. This is a bit more advanced but you can read all about this behavior in Understanding Placeholder Selectors – placeholder selectors are special kind of extend which we’ll talk about soon.


Mixins


Mixins are another favorite feature of preprocessor users. Mixins are reusable rulesets – perfect for vendor-specific rules or for shorthanding long CSS rules.


How about creating a transition rule for hover elements:


 @mixing hover-effect -webkit-transition: background-color 200ms; -moz-transition: background-color 200ms; -o-transition: background-color 200ms; transition: background-color 200ms; a @include hover-effect; .button @include hover-effect; 

Mixins also allow you to use variables to define the values within the mixin. We could rewrite the example above to give us control over the exact time of the transition. We may want buttons to transition a tiny bit slower for example.


 @mixin hover-effect( $speed ) -webkit-transition: background-color $speed; -moz-transition: background-color $speed; -o-transition: background-color $speed; transition: background-color $speed; a @include hover-effect(200ms); .button @include hover-effect(300ms); 

Placeholder Selectors


Placeholder selectors were introduced with Sass 3.2 and solved a problem which could cause a bit of bloat in your generated CSS code. Take a look at this code which creates error messages:


 .message font-size:1.1em; padding:11px; border-width:1px; border-style:solid; .message-danger @extend .button; background: #C20030; color:#fff; border-color: #A8002A; .message-success @extend .button; background: #7EA800; color:#fff; border-color: #6B8F00; 

It is most likely that the message class will never be used in our HTML: it has been created to be extended, not used as is. This causes a little bit of bloat in your generated CSS. To make your code more efficient you can use the placeholder selector which is indicated with a percentage sign:


 %message font-size:1.1em; padding:11px; border-width:1px; border-style:solid; .message-danger @extend %button; background: #C20030; color:#fff; border-color: #A8002A; .message-success @extend %button; background: #7EA800; color:#fff; border-color: #6D9700; 

At this stage you may be wondering what the difference between extends and mixins are. If you use placeholders they behave like a parameter-less mixin. This is true, but the output in CSS differs. The difference is that mixins duplicate rules while placeholders will make sure that the same rules share selectors, resulting in less CSS in the end.


Operations


It’s hard to resist the pun here, but I’ll refrain from any medical jokes for now. Operators allow you to do some math in your CSS code and can be pretty darn helpful. The example in the Sass guide is perfect for showcasing this:


 .container width: 100%; article float: left; width: 600px / 960px * 100%; aside float: right; width: 300px / 960px * 100%; 

The example above creates a 960px based grid system with minimum hassle. It will compile down nicely to the following CSS:


 .container width: 100%; article float: left; width: 62.5%; aside float: right; width: 31.25%; 

One great use I find for operations is to actually mix colors. If you take a look at the success message Sass above it’s not clear that the color of the background and the border have some sort of relationship. By subtracting a shade of gray we can darken the color, making the relationship visible:


 $primary: #7EA800; .message-success @extend %button; background: $primary; color:#fff; border-color: $primary - #111; 

The lighter the subtracted color, the darker the resulting shade will be. The lighter the added color, the lighter the resulting shade.


Functions


There are a great number of functions to use: Number functions, string functions, list functions, color functions and more. Take a look at the long list in the developer documentation. I’ll take a look at a couple here just to show you how they work.


The lighten and darken function can be used to change the lightness of a color. This is better than subtracting shades, it makes everything even more modular and obvious. Take a look at our previous example using the darkening function.


 $primary: #7EA800; .message-success @extend %button; background: $primary; color:#fff; border-color: darken( $primary, 5 ); 

The second argument of the function is the percentage of darkening required. All functions have parameters; take a look at the documentation to see what they are! Here are a few other self-explanatory color functions: desaturate, saturate, invert, grayscale.


The ceil function, just like in PHP, returns a number rounded to the next whole number. This can be used when calculating column widths or if you don’t want to use a lot of decimal places in the final CSS.


 .title font-size: ceil( $heading_size * 1.3314 ); 

Overview


The features in Sass give us great power to write better CSS with less effort. The proper use of mixins, extends, functions and variables will make our stylesheets more maintainable, more legible and easier to write.


If you’re interested in another similar CSS preprocessor I suggest taking a look at LESS (or check out our beginner’s guide) – the underlying principal is much the same!


A Simple And Easy Guide To Understand Sass