Showing posts with label Images. Show all posts

Thursday, June 25, 2015

Why You Should Use Stock Images on Your Website


For all practical purposes, images make up the internet. No matter what type of content you are offering, be it news pieces, design tutorials, sports analysis or even an eCommerce shop, your website is incomplete and outright bland in the absence of proper images and photos. This is precisely why so many social networks – like Tumblr and Pinterest – focus a lot on the role of images.


If you would like to try Bigstock free for 7 days and download up to 35 royalty-free stock images, click here: Bigstock Free Trial.

Young girl in sunglasses posing with skateboard. Lifestyle outdoor toned portrait


So, where does one get stock images from? Well, if you are even a little bit serious about your content, you should by all means consider investing in stock photography from a professional online service.


And when it comes to finding stunning stock photos at an affordable price, Bigstock is your best bet! In this post, we take a closer look at what Bigstock has to offer.


bigstock_images


Bigstock: Royalty-Free Images, Vectors and Photos


In simple words, Bigstock is a marketplace for images and photos of all kinds and genres. It boasts a collection of over 25 million photographs and illustrations, and the count is ever rising. And, yes: the images are royalty-free, and you can use them in virtually any major project on your calendar.


Features


Bigstock has a lot to offer. You can browse through photos of daily life, city life, nature and wildlife, as well as vectors, illustrations, stock videos and even tutorials! Beyond that, Bigstock also gives away one free image per week.


Here’s what you get when you signup for Bigstock:


  1. As already mentioned, Bigstock has a huge collection of images and stock photography. With over 25 million images at your disposal, you can be sure that you will never find yourself short of an image or photo that you need.

  2. Also, Bigstock entitles you to re-download as well. So once you purchase an image license, you are free to re-download it as many times as you wish.

  3. Bigstock receives contributions from professional photographers and artists based around the globe. If there is one place that has pro-level images to offer, it is Bigstock!

  4. Bigstock adds over 75,000 new images each week to its already gigantic collection.

  5. All images are available in small, medium, large and x-large JPEG files, along with vector files in AI or EPS format.

illustration


Pricing


Bigstock’s pricing model is really simple. At per month, you can opt for either a 5 images per day plan (up to 150 images per month), or 50 images per month (no daily download caps). If, however, you need more, you can go for their plan, that gives you up to 10 images per day (for a total of 300 images on a monthly basis).


Want more?


Well, Bigstock has a special Free Trial offer available too. You can give their services a spin for 7 days, and then decide whether you wish to continue or not. You can grab up to 35 free images (5 images per day for a total of 7 days) during the trial period.


Once the trial period ends, you’ll automatically continue on to a monthly Bigstock subscription, with no disruption in service. So you have nothing to lose here: simplysign up for the free trial, and see for yourself just how impressive Bigstock’s offerings are!


Conclusion


With millions of royalty-free images, Bigstock is a premier name in the field of stock imagery. And with the free trial offer, you can check it out yourself. So without wasting any more time, just get started with Bigstock— there are 25 million images waiting for you!


Hawaii road trip - car hula dancer doll dancing on the dashboard in front of the ocean. Tourism and travel freedom concept.


Visit Bigstock.com →


The post Why You Should Use Stock Images on Your Website appeared first on Speckyboy Design Magazine.


Why You Should Use Stock Images on Your Website

Friday, June 12, 2015

7 Tips to Manage Images In Your Photoblog

You love photography and you have a blog, so why not put both together? Blogging is one of the best ways to build a great image and reputation for your business and to display your latest and greatest work online. Of course you could make use of stock images and Creative Commons materials instead of using your own images.


However, at the end of the day, images create an atmosphere around your post and influence your readers’ perception, so don‘t underestimate the value of well-placed images on your blog. Here are some tips on how to use photos on your blog post more effectively in order to provide a pleasant reading experience for visitors and to drive more traffic to your site.


1. Text-Image Balance


You’re probably aware that people tend to scan through articles when online, looking for something that catches their attention. This is reason enough for one to carefully select photos to add to a post.


If you run a photography blog, don’t treat it as your portfolio. A portfolio is aimed at showcasing your best photos to impress clients. Your blog, on the other hand, is intended to tell a story.


Display only as many photographs as necessary to complete your story. Illustrate your thoughts with these images. In my opinion, four or five photos per 1000 words is ideal although in most cases, the final number of images you need depends on the topic you are blogging about.


2. Optimize Images For Speed


Photos can cause a usability issue if they’re too large. In order to improve your web site performance, you need to optimize your image file sizes and make them easy to download as fast as possible.


Google uses page loading time as a factor in search ranking results. So when posting photos online, make sure to compress them as much as possible without loss in quality.


You can do this with Photoshop. First of all, change your resolution to 72 dpi. Desktop and mobile devices don’t need as many dots per inch as printed products do in order to to look good. After that, Save for Web & Devices in Photoshop. Use the JPEG – Very High preset setting, as it does not lower the quality of the image significantly.


There are also a few other tools that can compress your photos, for example, Smash.it from Yahoo or specific plugins for WordPress, like WP Smush It. If you need more tools, check out the plugins in this post.


The optimal size for your blog post images is 600px to 800px wide. In this range you’ll have a high enough resolution for sharing across all social media sites without slowing down loading times.


3. Include SEO for Your Images


Search engine optimization of your site should extend to your images. Very often visitors use Google Image Search to search for specific images. So try to rename your images with SEO-friendly names or with keywords that are specific and relevant to your site.


For instance, if someone is looking for "how to take wedding photos," it’s more likely they will find a photo with a filename like tips-how-to-take-wedding-photos.jpg instead of one named DCS678954.jpg.


Make sure each image you use carry a descriptive caption, a keyword-rich file name and relevant text in the "title" and "alt" attributes. The "title" should obviously include your headline while the "alt" attribute specifies alternate text for an image, in the event that your image cannot be displayed to the user (because of a slow connection, an error in the "src" attribute or if the user uses a screen reader).


Of course a graphical browser will only display the image, and will only display the alt text if the user asks it to show the image properties or has configured the browser not to display the image. Alternative text won’t necessarily be seen by your visitors, but search engines like Google will pick up on it and this will help with your search engine ranking.


4. Protect Your Photos


No matter how hard you fight to prevent it, people will find a way to use your photos without your permission and consent. Here are a few ways to apply some protection to the photos on your blog:


  • Blend a watermark into your photos

  • Disable right-click (doesn’t prevent screenshots).

  • Track the use of your photos online with image lookup tools, such as TinEye.

  • Edit the image metadata

Watermarking is one of the most effective ways to protect your brand in a subtle way by reminding readers about the original source of the image. It works best with social media, but try to keep your watermark unobtrusive since bold, huge and loud watermarks distract from the beauty of the photo itself.


5. Think Mobile


Ensure your blog is responsive so mobile users can easily browse it. A responsive site adapts to various screen resolutions: desktops, tablets, and smartphones, which is important as what looks good on desktop won’t necessarily look good on a mobile screen.


Check out this 50 Useful Responsive Web Design Tools For Designers post on a tool you can use to turn your site responsive.


If, however, you don’t want to make your site responsive or create a specific mobile version of the site, you can try WPtouch Mobile Plugin available from the official WordPress site, which creates a sleek and well-designed mobile site in no time.


6. Use Image-Based Social Media


Social networking is a great opportunity to promote your brand and help with search engine optimization. The more likes and shares you get, the greater the chances of your article appearing higher up in Google’s search results. Google ranks posts by the number of shares also so it”s a good idea to include a social share button on your site pages.


Don’t forget to track social referrals to your blog with Google Analytics. Go to Acquisition > Overview Report and click on Social. Also be sure to include a Pin It Button for your images to make the process of sharing via Pinterest easier. Use Pinterest Pin It Button For Images to add the original Pin It button to all your images or create your own custom button to suit the style and design of your blog.


Alternatively, you can design a custom-made button and upload it in JPG format to use as a button.


7. Add Your Headshot and Bio


A well-written biography section and a headshot are essential elements of any blog post. On the Internet, people build trust based on what they can see. It’s exactly the same as judging a book by its cover. Make "your cover" as pleasant and informative as possible.


Write a decent, short bio including your skills, experience, and a few links to your social media accounts. This will help potential clients find out more about you, and get in touch with you easily.


Bonus: Tools to Create Images for Blogs


Defrozo is a free photography marketing platform that allows you to create both a photo portfolio and a blog. With its all-in-one workspace and drag-n-drop editor, creating a blog post and inserting images from your Defrozo media library is a breeze.


Canva is a start-to-finish design application that is created for non-designers. With this tool you can create beautiful images and add some typography on it which is a great choice for blog posts.


Recitethis will help you create inspiring images with quotes which have become so popular on Pinterest, Instagram and other visual social media. Choose a pattern from their collection, type the wording you would like to place on it and download the image.


Conclusion


The tips above should help you to establish a personalized brand and boost your SEO and marketing. Remember that your blog is a living entity. It needs to be updated regularly with your latest work. Keep up with it and the benefits will outweigh the time you spend on your blog.


How do you keep your blog popular? Please share your tips and hints with us in the comment field below. Your feedback is welcomed!


7 Tips to Manage Images In Your Photoblog

7 Tips to Manage Images In Your Photoblog

You love photography and you have a blog, so why not put both together? Blogging is one of the best ways to build a great image and reputation for your business and to display your latest and greatest work online. Of course you could make use of stock images and Creative Commons materials instead of using your own images.


However, at the end of the day, images create an atmosphere around your post and influence your readers’ perception, so don‘t underestimate the value of well-placed images on your blog. Here are some tips on how to use photos on your blog post more effectively in order to provide a pleasant reading experience for visitors and to drive more traffic to your site.


1. Text-Image Balance


You’re probably aware that people tend to scan through articles when online, looking for something that catches their attention. This is reason enough for one to carefully select photos to add to a post.


If you run a photography blog, don’t treat it as your portfolio. A portfolio is aimed at showcasing your best photos to impress clients. Your blog, on the other hand, is intended to tell a story.


Display only as many photographs as necessary to complete your story. Illustrate your thoughts with these images. In my opinion, four or five photos per 1000 words is ideal although in most cases, the final number of images you need depends on the topic you are blogging about.


2. Optimize Images For Speed


Photos can cause a usability issue if they’re too large. In order to improve your web site performance, you need to optimize your image file sizes and make them easy to download as fast as possible.


Google uses page loading time as a factor in search ranking results. So when posting photos online, make sure to compress them as much as possible without loss in quality.


You can do this with Photoshop. First of all, change your resolution to 72 dpi. Desktop and mobile devices don’t need as many dots per inch as printed products do in order to to look good. After that, Save for Web & Devices in Photoshop. Use the JPEG – Very High preset setting, as it does not lower the quality of the image significantly.


There are also a few other tools that can compress your photos, for example, Smash.it from Yahoo or specific plugins for WordPress, like WP Smush It. If you need more tools, check out the plugins in this post.


The optimal size for your blog post images is 600px to 800px wide. In this range you’ll have a high enough resolution for sharing across all social media sites without slowing down loading times.


3. Include SEO for Your Images


Search engine optimization of your site should extend to your images. Very often visitors use Google Image Search to search for specific images. So try to rename your images with SEO-friendly names or with keywords that are specific and relevant to your site.


For instance, if someone is looking for "how to take wedding photos," it’s more likely they will find a photo with a filename like tips-how-to-take-wedding-photos.jpg instead of one named DCS678954.jpg.


Make sure each image you use carry a descriptive caption, a keyword-rich file name and relevant text in the "title" and "alt" attributes. The "title" should obviously include your headline while the "alt" attribute specifies alternate text for an image, in the event that your image cannot be displayed to the user (because of a slow connection, an error in the "src" attribute or if the user uses a screen reader).


Of course a graphical browser will only display the image, and will only display the alt text if the user asks it to show the image properties or has configured the browser not to display the image. Alternative text won’t necessarily be seen by your visitors, but search engines like Google will pick up on it and this will help with your search engine ranking.


4. Protect Your Photos


No matter how hard you fight to prevent it, people will find a way to use your photos without your permission and consent. Here are a few ways to apply some protection to the photos on your blog:


  • Blend a watermark into your photos

  • Disable right-click (doesn’t prevent screenshots).

  • Track the use of your photos online with image lookup tools, such as TinEye.

  • Edit the image metadata

Watermarking is one of the most effective ways to protect your brand in a subtle way by reminding readers about the original source of the image. It works best with social media, but try to keep your watermark unobtrusive since bold, huge and loud watermarks distract from the beauty of the photo itself.


5. Think Mobile


Ensure your blog is responsive so mobile users can easily browse it. A responsive site adapts to various screen resolutions: desktops, tablets, and smartphones, which is important as what looks good on desktop won’t necessarily look good on a mobile screen.


Check out this 50 Useful Responsive Web Design Tools For Designers post on a tool you can use to turn your site responsive.


If, however, you don’t want to make your site responsive or create a specific mobile version of the site, you can try WPtouch Mobile Plugin available from the official WordPress site, which creates a sleek and well-designed mobile site in no time.


6. Use Image-Based Social Media


Social networking is a great opportunity to promote your brand and help with search engine optimization. The more likes and shares you get, the greater the chances of your article appearing higher up in Google’s search results. Google ranks posts by the number of shares also so it”s a good idea to include a social share button on your site pages.


Don’t forget to track social referrals to your blog with Google Analytics. Go to Acquisition > Overview Report and click on Social. Also be sure to include a Pin It Button for your images to make the process of sharing via Pinterest easier. Use Pinterest Pin It Button For Images to add the original Pin It button to all your images or create your own custom button to suit the style and design of your blog.


Alternatively, you can design a custom-made button and upload it in JPG format to use as a button.


7. Add Your Headshot and Bio


A well-written biography section and a headshot are essential elements of any blog post. On the Internet, people build trust based on what they can see. It’s exactly the same as judging a book by its cover. Make "your cover" as pleasant and informative as possible.


Write a decent, short bio including your skills, experience, and a few links to your social media accounts. This will help potential clients find out more about you, and get in touch with you easily.


Bonus: Tools to Create Images for Blogs


Defrozo is a free photography marketing platform that allows you to create both a photo portfolio and a blog. With its all-in-one workspace and drag-n-drop editor, creating a blog post and inserting images from your Defrozo media library is a breeze.


Canva is a start-to-finish design application that is created for non-designers. With this tool you can create beautiful images and add some typography on it which is a great choice for blog posts.


Recitethis will help you create inspiring images with quotes which have become so popular on Pinterest, Instagram and other visual social media. Choose a pattern from their collection, type the wording you would like to place on it and download the image.


Conclusion


The tips above should help you to establish a personalized brand and boost your SEO and marketing. Remember that your blog is a living entity. It needs to be updated regularly with your latest work. Keep up with it and the benefits will outweigh the time you spend on your blog.


How do you keep your blog popular? Please share your tips and hints with us in the comment field below. Your feedback is welcomed!


7 Tips to Manage Images In Your Photoblog

Saturday, May 16, 2015

How to Make Your Blog Post Images Retina-Friendly

We’ve heard that we need to start designing for retina screens for quite a while now. With more and more products being released with screens that are 2x the pixel density, our designs can start to look unprofessional and outdated by more people. And if you’re a web designer or blogger by profession, having pixelated images on your sites just won’t fly.


If you’re keeping up, you’ve already switched raster your images to vector wherever possible, especially when it comes to logos and icons.


One area where it’s easy to forget about retina-friendly images is in our blog content.


I became aware of this when I began to use a new Macbook Pro at work and saw my own blog on a retina screen for the first time. My pupils dilated and my stomach sank. It looked awful. I was pushing off the @2x switch for a while because I was afraid it was going to be too complicated. I only had a vague idea of what needed to be done and felt like it was outside of my skills. Turns out I was wrong, and it’s a much easier process than I thought!


If you’re producing regular blog content and want your images to look good on any screen, this tutorial is for you. It’s a lot simpler than it seems, I promise.


In this post I’ll talk about how to create your images, how to save the images for web, and then how to import and use your images within your blog posts.


A Note on Responsive Images


Before we get into it, I want to mention responsive images. The goal for good web design using images is to to provide the highest quality image at the lowest bandwidth possible, all the while keeping in mind the environment of the photo (portrait vs landscape, for example). The ability to do this using srcset, Javascript polyfills and using some critical thinking when it comes to creative image cropping, is a powerful tool that should be used whenever possible. (I recommend taking this course on responsive images for an in-depth look at how best to handle images for @1x and @2x screens of all sizes.)


However, the main purpose of this post is to show you how to provide @2x images for your blog audience who may have access to a high DPI laptop, tablet, or phone.


So, this process can (and should) be more complicated for the best performance, but it will hold true for most blog post photos.


How to Create Your Retina-Ready Images


Image Width is the Most Important for Retina


The most important thing when you’re creating retina-friendly images is the actual dimensions of the image.


Here’s the big secret to creating images @2x: make your images double-wide.


For example, if by default your blog’s images are set to be 700px wide x 500px high, all you have to do moving forward is create your images at 1400px wide by 1000px high. If you can multiply by two, you can make retina-ready images.
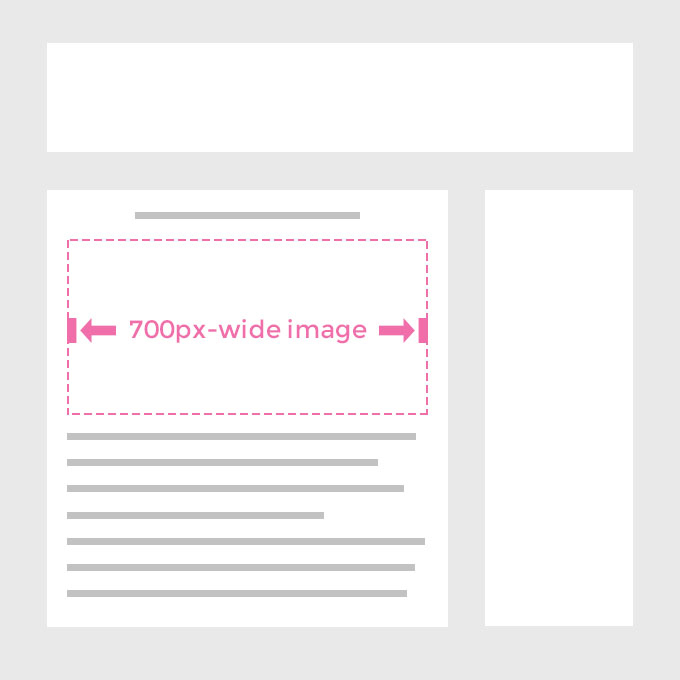

Blog wireframe to show content width for uploading retina images
If you have a 700px wide area for images, create your images at 1400px wide for retina screens.
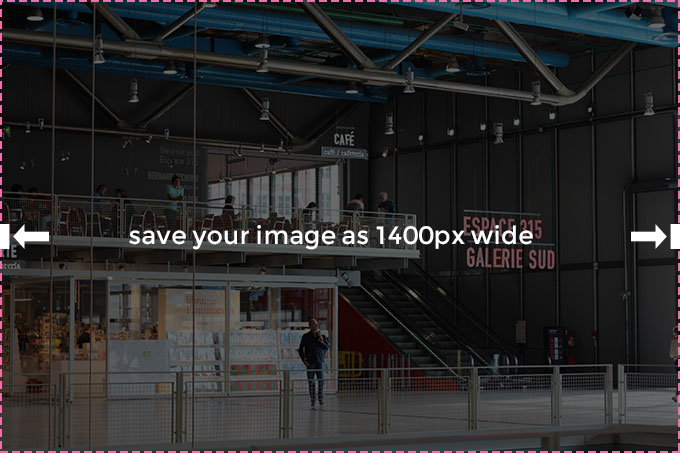

1400px-wide


All images loaded to the web should be 72dpi, or dots per inch. Your retina-ready images stay at 72dpi, so we’re not changing anything with that for retina.


Quick note: this doesn’t mean you can take your existing 700px wide images and scale them up in Photoshop. You have to start with a big, 2x image. This may be obvious to some, but I didn’t want to leave this out for beginners.


This isn’t all, though. Keep reading to make sure your images are optimized for web and your CSS is correct.


Saving For Web in Photoshop


You may read this and think, really, that’s it? But the other important thing is that you still don’t want your site to load slowly. It’s important to get into the habit of Saving for Web within Photoshop, and there are a few components to get familiar with.


So, when you’re saving images in Photoshop, there are a few things to keep in mind, having to do with the image type, the width of the image, and the quality of the image.


Saving For Web Dialog Box


In Photoshop, there are a few methods of saving an image. You can use the well-known method of doing a Save-As, but you need to get into the habit of Saving For Web. On a Mac, the shortcut is CMD+OPTION+SHIFT+S, and on a PC it’s CTRL+ALT+SHIFT+S. If you’re doing this process a lot, learning the shortcut will save you a lot of time.
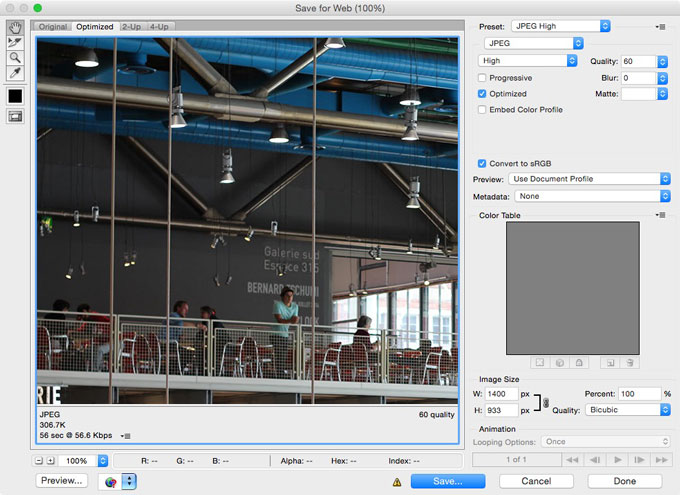

Save for web dialog box in Photoshop


Within this screen that pops up, there are a lot of options. First, let’s figure out what type of image you need, keeping in mind the ultimate goal is to have the smallest file size at the highest visual quality.


Image Type


Unless your blog post image is fully vector shapes and text, you’re going to want to save your image as a JPEG. Otherwise, you can save it as a PNG.


The great thing about the Save for Web dialog box is that it will show you the file size as you switch between settings in the bottom-left corner. Remember the goal: smallest file size at highest visual quality. With the preview and the file size shown and the goal in mind, you can toggle through your options if you’re not sure what file type is best.
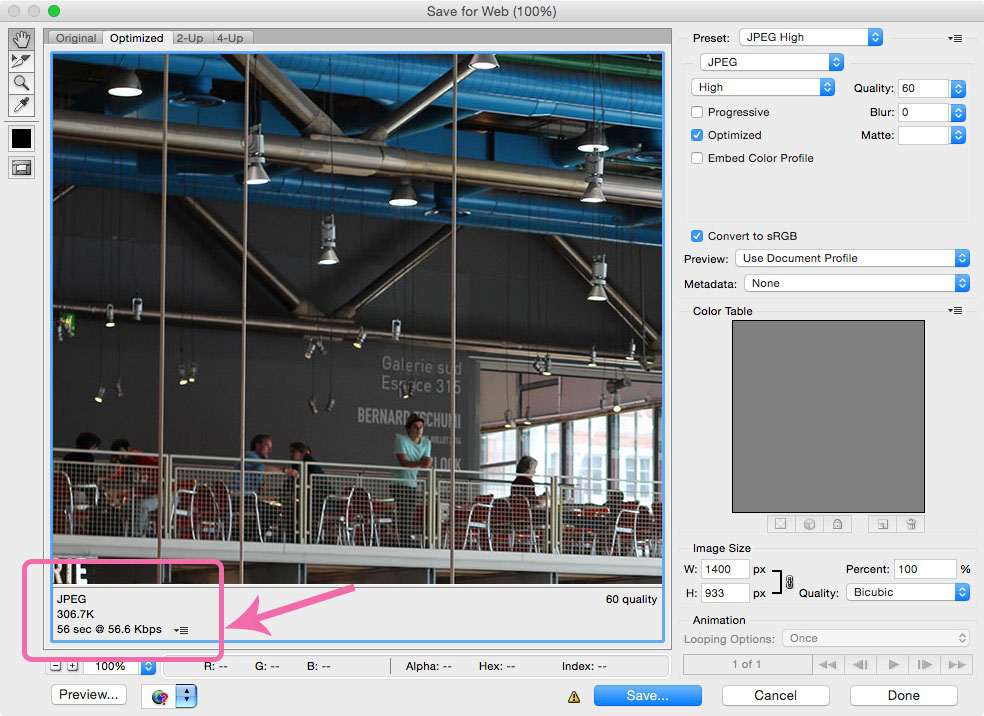

The image file size is in the bottom left corner in the Save For Web dialog box in Photoshop


Image Quality


You can reduce the image quality of your double-wide image to Medium within the Save for Web dialog box, and your images will still look amazing on a Retina screen. (For PNG, you can use PNG-8 instead of PNG-24).


So if I’m creating an image for my blog, I create it at 1400px wide, Save for Web as JPEG Medium using the presets, and then upload it to my blog.
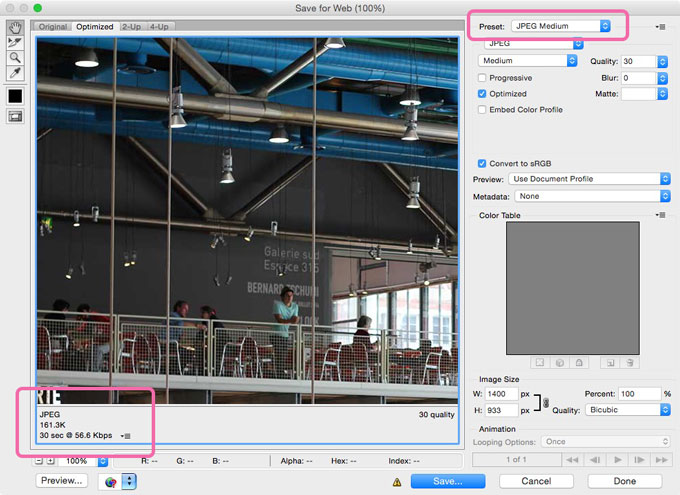

Choose JPEG Medium for the file preset in Photoshop when saving Retina-ready images


Go ahead and save your image file with the settings outlined above.


How to Use Your Retina-Ready Images Within Your Blog


The last part is uploading your new huge photos to your blog. Again, this part is simple. Upload your photos to your blog as normal.


But now you want to set them to be exactly 1/2 the width, so it will match your content and not be huge and weird looking. There are two ways to do this. If you feel comfortable digging into your CSS, set a rule so your content images will always be 100% width and have an automatic height.


Example CSS:


.blog-content img
max-width: 100%;
height: auto;
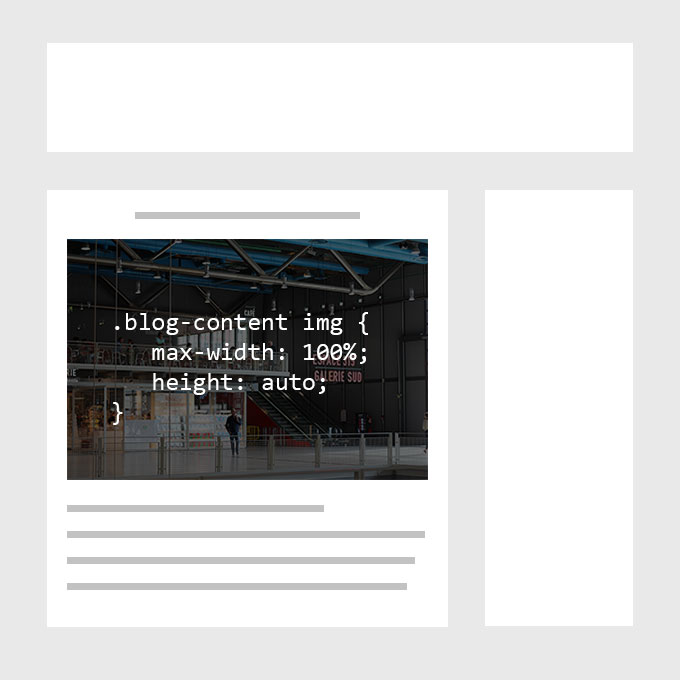

Change your blog CSS so your images stay within the content DIV and are sized proportionally


If you can’t dig into your CSS, manually set the width of your images to be exactly half. If we’re looking at an image for my 700-px wide blog content, I’d upload my 1400px image and then set width=”700″ within the img tag.


banner


But What About All of My Other Blog Images?


Now that you know how to make your images look good on Retina screens, does this mean you should update all of your old images? Not necessarily. But there are some that you may want to pay more attention to.


At the very least, you’ll want to update your images that occur multiple times on your site. These images may include ones in your header, sidebar, and footer.


You may also want to do this for images that lie on your static pages, like your about page and portfolio pages especially.


If you’re feeling ambitious, you can try to update images for the 10 most popular blog posts on your site.


There’s a huge bonus: you may even notice that your Medium Quality 2x photos are actually smaller file sizes than your existing 1x photos!


The most important thing? Moving forward, you now create your images at 2x the width and height and shrink them down on your site. That will future proof your site, at least for a while.


Conclusion


As designers and artists, it’s important for our content to both look great and load quickly. Keeping on top of the more technical aspects of digital content creation can be hard, but making sure your images look good can now be a top priority, now that you know how to do it.


Make sure to investigate responsive images more, but for now you’re well-equipped to start providing @2x images in your blog posts.


*tl;dr*? Make your images twice as wide, save-for-web in Photoshop at medium quality. Load images onto your blog and resize to fit in your CSS or inline if you have to. Spend the time to make your header, sidebar, and footer images retina-ready. Do the same for static pages, portfolio pieces, and maybe your top 10 blog posts.


Have you started to make your content retina-ready?


Jennifer Coyle is a Philadelphia-based Designer and illustrator who loves to create fonts and resources on Creative Market. She also shares tutorials and inspiration for designers and creative entrepreneurs at Hello Brio Studio. Take her Skillshare class to learn how to make your own hand drawn font.


Products Seen In This Post:


getpaidtowrite-banner
How to Make Your Blog Post Images Retina-Friendly

Saturday, April 18, 2015

New Star Wars: The Force Awakens Images Leak

April 16-19 is Star Wars Celebration, and if you’re not in Anaheim for the event, well we’ve got some cool news for you. Images have already come out of the event, and if it’s not happening live, then it’s happening on Twitter.


First, a shot from the official program for the event, showing the new Stormtrooper gear:


Then there’s a series of tweets from Tim Veekhoven, who lists himself as a contributor to the Official Star Wars site. Here are his shots:


Then, via Polygon, we see even more:


As usual with these things, more will be revealed in due time. Speaking of, do I still have time to get on a plane and go to Anaheim?


Update: New Teaser


Following the release of the images above, the new teaser just hit YouTube. Are you as excited as we are?


Kevin Whipps is a writer and editor based in Phoenix, Arizona. When he’s not working on one of the many projects in his queue, he’s looking for fun and irreverent things online to share with his friends.
New Star Wars: The Force Awakens Images Leak

Wednesday, March 18, 2015

GraphicStock: Unlimited Stock Images and Textures


Whether you are a casual web and graphic design enthusiast or an enterprise brand, if you have had anything to do with the internet, you must already be aware of the importance of images on web pages. No matter what type of website you are browsing or building, images play a key role as they highlight not just your content but also add to the overall appeal of the design.


As such, when it comes to stock images and graphics such as vectors, icons and other textures, many professional designers and users tend to go for premium stock offerings – though that doesn’t have to mean paying premium prices. If you are looking for some awesome stock graphics and textures, GraphicStock is the way to go.


Beautiful Couple On Bicycles.


What is it About?


GraphicStock is, in essence, a library of stock graphics, images, icons, buttons, textures, and other graphic-related items. It is a subscription based service, much like WordPress theme shops, wherein you sign up for a given subscription and then are entitled to unlimited downloads as long as your subscription is valid. Plus, even after your subscription expires, you will still be able to continue using the downloaded media in your projects — just that new downloads will no longer be available to you.


However, unlike most other similar services, GraphicStock does not offer a pay-per-download model. Instead, it relies on a pure subscription based model, where you sign up once, and then can download unlimited images and resources. Obviously, this is extra beneficial for the customer, since after a few initial downloads, your subscription will essentially pay itself off, and you can still continue downloading as many resources and graphics as you want.


The GraphicStock collection is huge, and new content is being added on a regular basis. Furthermore, as you might have already guessed it, all content in the GraphicStock archive is free to use after you have subscribed, and is totally royalty-free.


Speaking of the collection itself, your choices are plenty: the GraphicStock library has been divided into genres such as business, people, nature, fashion, travel, and so on. Plus, the different content types are also separately sorted, so no matter what you are looking for, be it backgrounds, images, textures or something else — you will not find yourself running out of resources after you sign up for GraphicStock.


Musical Man And Musical Node With Burst Effect.


Pricing


GraphicStock follows a simple pricing structure. Instead of requiring you to pay for every graphic that you download, you just pay one flat rate. The subscription in itself is ridiculously budget-friendly: per month and get, yes, unlimited downloads with no caps on the number of images or graphics that you can download. Of course, you can also start with a free trial that gets you 7 days of free downloads


Quite obviously, GraphicStock’s pricing model is pretty simple, and if you are a regular user, your subscription pricing will pay for itself pretty quickly.


Retro Media Objects.


Conclusion


GraphicStock can be useful for a wide variety of target audiences: for site masters and content creators, as well as for enterprise users who need an easy solution for such resources. Most importantly, GraphicStock can prove to be a blessing for web designers as well, because you can get images, buttons, textures, and other relevant media for a fraction of the price — not to mention the fact that in the absence of download caps, you can grab as many graphics and resources as you want or require.


Furthermore, GraphicStock also offers a 7-day unlimited trial where you can test GraphicStock for yourself, without any commitment or contract. You will be entitled to maximum 20 downloads per day during your trial period, and even if you do not wish to continue the trial after the seven day time frame expires, you can still continue using your downloads in your projects.


So what are you waiting for? Go ahead and check out GraphicStock — their collection of over 250,000 graphics, images and tools is waiting for you!


This post has been sponsored by Syndicate Ads.


The post GraphicStock: Unlimited Stock Images and Textures appeared first on Speckyboy Web Design Magazine.


GraphicStock: Unlimited Stock Images and Textures

Tuesday, March 10, 2015

How To Create Anaglyph 3D Images That Really Work!

I originally planned to write this tutorial on how to create a retro 3D effect that mimicked the offset red/blue images that were seen in old 3D movies, comics and posters. But then I thought, rather than just recreate the effect, why not try and produce an anaglyph 3D image that actually works?! So I boggled my mind with the science behind stereoscopy and figured out how to create some really cool 3D images that pop out from your screen. Grab yourself some old school 3D specs and follow this guide to learn how to produce your own anaglyph 3D images in Photoshop.


Chris wearing 3D glasses


In order to follow along with this tutorial and see these images in full effect you will need to acquire some 3D glasses with red & cyan lenses. You can find the original white card style glasses online for a couple of $/£/€, which work perfectly well.


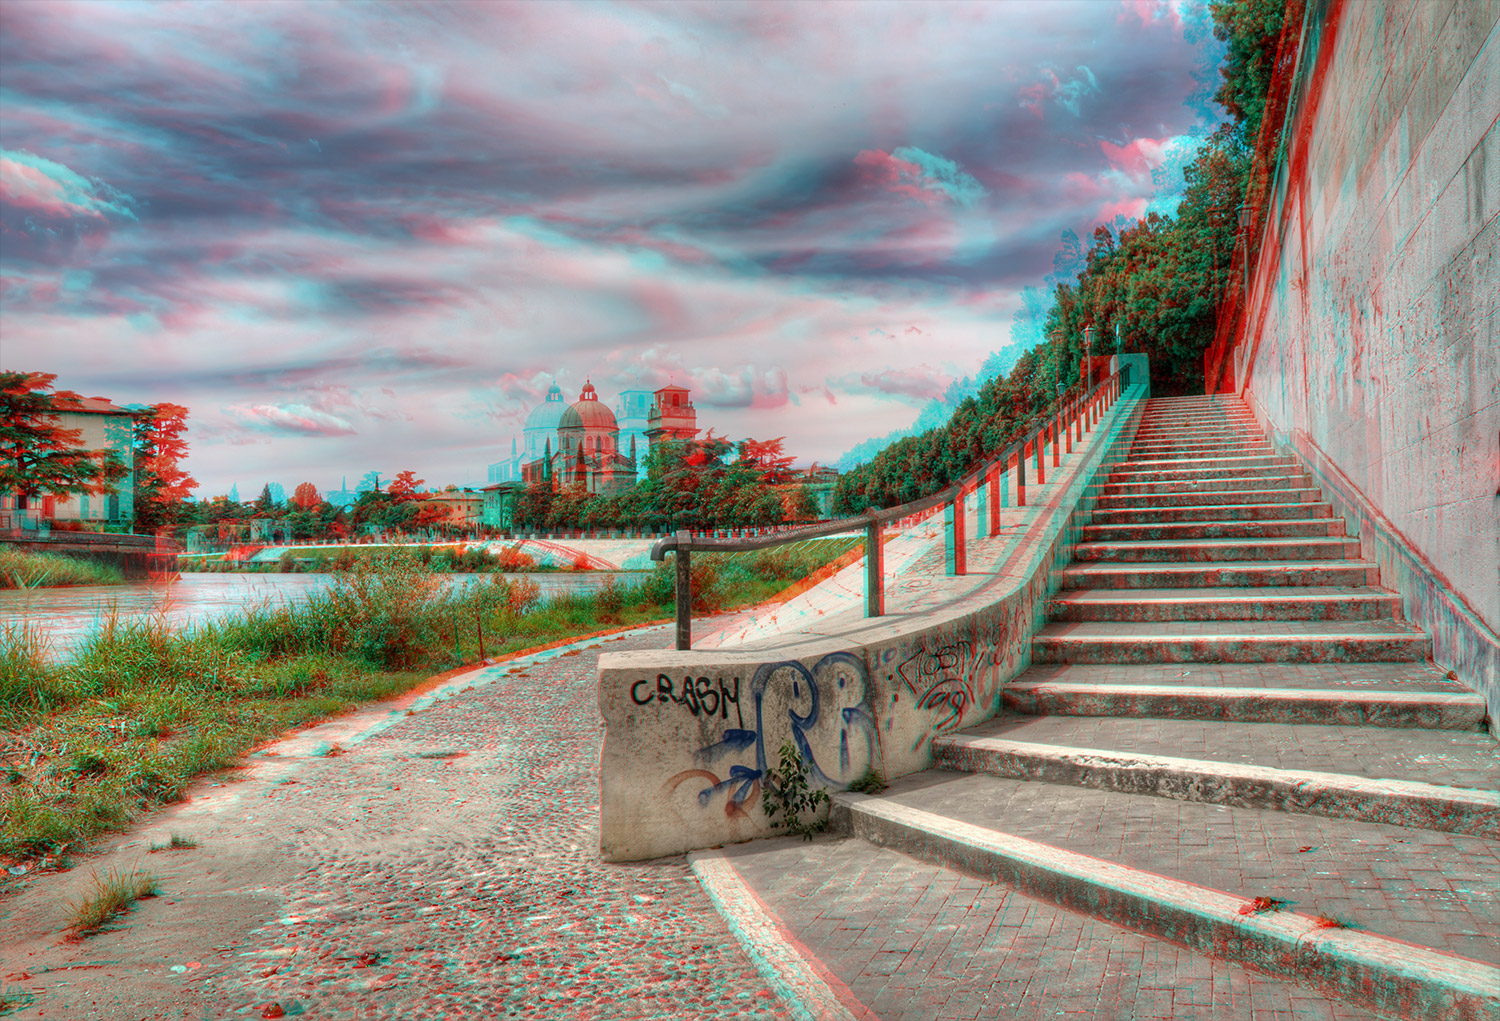
3D Anaglyph photograph


Anaglyph 3D pictures can be created in two ways; The first technique combines two separate images from a camera and results in some really cool photographs.


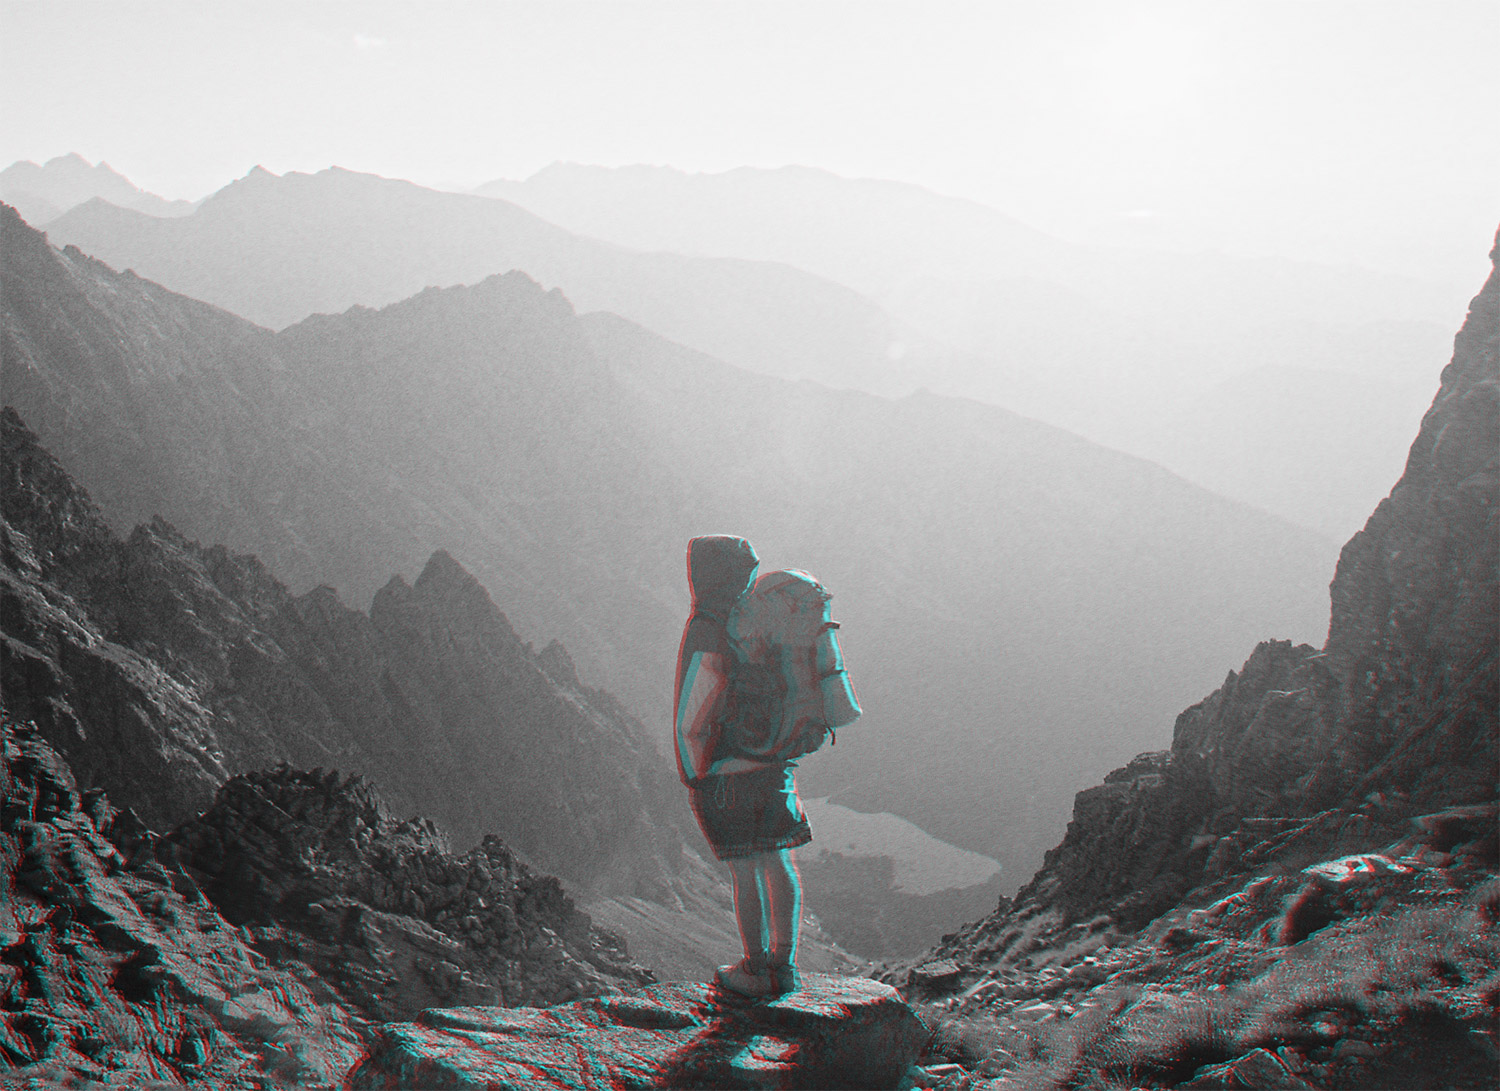
3D Anaglyph photograph


The second technique produces the effect with just one image, which makes it particularly useful for illustrations, or any photograph that wasn’t captured in stereo.


Creating Anaglyphs with 2 images


Anaglyph creation from 2 images


The 2 image technique really helps you understand the science behind stereoscopic images. Anaglyphs are created by combining two images from different angles, much like the way our eyes work. Try looking at an object on your desk and close one eye, then the other. Notice how the object appears to move? This technique uses the same principle. Two photos are taken, either with two cameras strapped together at a set distance apart, or from one camera which is moved on a tripod. Take shots just a few inches apart for close up subjects, and a couple of feet for scenes with lots of distance.


Open up your two photographs in Photoshop These particular images are a ready made stereoscopic pair from Shutterstock. Select All (CMD+A) and Copy (CMD+C) one image, then Paste (CMD+V) it into the other image document. Double click the Background to convert it into a normal layer. Remember which image is the ‘left’ photo and which one is the ‘right’ photo. Name the layers accordingly.


Double click the ‘left’ layer again to open up the Layer Style options. Uncheck the Red channel then hit OK.


Open the Layer Style options for the ‘right’ layer, but this time uncheck both the Green and Blue channels. You’ll immediately see the anaglyph effect come to life.


Move the layer to align the offset images on a focal point in the foreground or background to fine tune the image and reduce any double vision issues you might be experiencing.


Use the Crop tool to trim the document to the area where both layers overlap.


3D Anaglyph photograph


The depth of the scene is automatically generated by the point of view shift between the two images. The exciting thing about this technique is you don’t know how the effect will turn out until you process the images, which relates to the fun of traditional photography.


Creating Anaglyphs with just 1 image


Anaglyph creation from 1 image


It is still possible to create Anaglyphs with just one image. This technique requires additional work in Photoshop, but it allows for more control over the final effect. It uses a depth map with Photoshop’s Displace filter to shift the second image out of place and thus creates the 3D effect.


Open your single image in Photoshop. We first need to create a depth map, which uses black and white tones to determine how much each specific area of the image needs to be displaced. Create a new layer, then draw a long thin rectangular selection and fill this area with a black to white gradient. This will be a handy reference for the range of tones.


We’ll start by highlighting the areas closest to the camera. Create a new layer and trace any foreground elements with the Polygonal lasso tool (or Pen tool), then fill the selection with white.


Set the Burn tool to target Highlights and reduce the opacity to 50%. Paint over areas of the white shapes that are slightly further away with a soft brush, changing them to a light grey instead. This gradual change of tone will be reflected as a gradual change of depth.


Create another new layer, and move it below the white layer. Draw a selection around any elements that are beyond the foreground. Take a mid-grey sample from the gradient reference and fill the layer so the tones are gradually darker.


Repeat the process of creating a new layer, move it below the previous layer, then trace and fill elements of the scene with tones to represent their depth. The darker the tone, the further away that portion of the image will recess when viewed with 3D glasses.


The final layer at the bottom of the stack should be pure black, which will only be visible in the far distance areas of the image.


Press CMD+A to Select All, the CMD+Shift+C to Copy Merged. Paste (CMD+V) this merged image at the top of the layer stack and apply a 10px Gaussian Blur from the Filter menu. This blurring will reduce the harshness of the edges after the displacement of the image.


Save the document as a .PSD with the filename ‘displace.psd’.


Open up the original photograph again then use the shortcut CMD+Shift+U to desaturate it. (Desaturation is totally optional, but it adds to the retro style of the anaglyph effect)


Press CMD+J to create the duplicate layer, then double click on the Background to convert it into a normal layer.


Double click the top layer to open up the Layer Style options. Uncheck the Red channel then hit OK.


Open the Layer Style options for the second layer, but this time uncheck both the Green and Blue channels. Unlike the previous technique, nothing has changed yet!


Select the top layer, then go to Filter > Distort > Displace. Enter 10px in the horizontal option and 0 in the vertical setting. Click OK, then navigate to the displace.psd file.


The layer will then be displaced according to our black and white depth map. Grab your 3D glasses to see the background recess into the distance.


Move the top layer to align the images on a focal point to reduce any unwanted double vision issues, then crop the document to size.


3D Anaglyph photograph


The benefit of this technique is you have full control over the manipulation of the image. Since we preserved the layers in the displacement map, you can head back and adjust the tones and blur to alter the 3D effect.


The post How To Create Anaglyph 3D Images That Really Work! appeared first on Blog.SpoonGraphics.


How To Create Anaglyph 3D Images That Really Work!